Microscope Activity.doc x712d
This document was ed by and they confirmed that they have the permission to share it. If you are author or own the copyright of this book, please report to us by using this report form. Report 3b7i
Overview 3e4r5l
& View Microscope Activity.doc as PDF for free.
More details w3441
- Words: 415
- Pages: 5
200 Microscopy: Parts & Observations 9 Name: ______________________
Date: ___________
1. Label the parts of a microscope on the diagram below.
Arm Base Body tube Coarse adjustment Diaphragm
1
WORD BANK Eyepiece Fine adjustment High power objective Light source Low power objective
Nosepiece Stage Stage clips Med. Power objective
Minority Science Programs – School of Biological Sciences – University of California, Irvine
2. Match the part of the microscope with its function. ___ ___
Where the slide is placed Used to focus when using the low power objective
1. Objectives 2. Base
___
Magnifies the specimen
3. Arm
___ Used to carry microscope adjustment ___ Used to focus when using the high power objective
4. Course
___
6. Eyepiece
The lens you look through, magnifies the specimen
___ s the microscope adjustment
3. Magnification:
5. Stage 7. Fine
Calculate the total magnification for each objective.
Eyepiece: 10X
Objectives: 4X, 10X, or 40X
4X objective:
__ ___ x ____ __ = _____ X__
10X objective: ______ x ______ = _____X__ 40X objective: ______ x ______ = _____X__
4. Observe the letter “e” with your naked eye and the microscope. Draw only what you see through the eyepiece. Include the correct magnification.
Naked eye
_______ X
What do you observe about the orientation and direction of the image? ___________________________________________________________________________ ___________________________________________________________________________ ___________________________________________________________________________ 5. Observe the colored comic strip with your naked eye and the microscope. Draw only what you see through the eyepiece. Include the correct magnification.
Naked eye
_______ X
6. Observe a prepared slide at different magnifications. Record the title of the slide. Draw only what you see through the eyepiece. Include the correct magnification. Slide title: __________________________
_______ X
_______ X
Slide Preparations: Letter “e”: Make a class set of letter “e” slides by printing out a page of tabdelimited e’s. Cut out each letter and secure them to slides using clear nail polish and a cover slip. Let dry overnight before using. Comic strip: Cut out small pieces of colored newspaper comic strips. Have students place them on a slide with a cover slip when viewing under the microscope. Prepared slides: Use a commercially available set of assorted prepared slides. Cheek cells: Have each student scrape the inside of their cheek using a cotton swab. Smear the swab on a clean slide to dislodge the cells. Add a drop of bromothymol blue stain and cover with a cover slip. Disinfect used slides with bleach. Only allow students to handle their own cheek cell slides.
Related Documents 3m3m1z

1 Microscope 542967
April 2022 0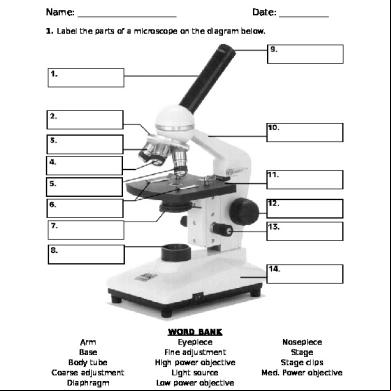
Microscope Activity.doc x712d
November 2022 0
Microscope Assign 8495n
December 2019 36
The Microscope 5l455b
June 2020 4
Petrological Microscope 2i445g
November 2022 0
Microscope Lab 3w6i72
December 2021 0More Documents from "Julie Gerber" u5a5x
Abiotic Vs Biotic Factors Worksheet.doc 5q5166
November 2022 0
Microscope Activity.doc x712d
November 2022 0
A Modern Approach To Quantum Mechanics - Townsend, Solutions To Selected Problems 663964
July 2022 0
Exercicios Resolvidos De Integrais Pdf 215265
November 2019 69
Etica Aplicada Y Democracia Radical Adela Cortina Pdf 151714
December 2019 579