Mobile Shop Management System 704u6y
This document was ed by and they confirmed that they have the permission to share it. If you are author or own the copyright of this book, please report to us by using this report form. Report 3b7i
Overview 3e4r5l
& View Mobile Shop Management System as PDF for free.
More details w3441
- Words: 10,678
- Pages: 121
INDEX Particular 1) Acknowledgment 2) Preface 3) Introduction 4) Objective 5) Computational Environment
5.1) Hardware Requirements 5.2) Software Requirements 6) Data Flow Diagram 7) System Design 7.1) Design Methodology 7.2) Database Design 7.3.1) Data Dictionary 7.3) Form Design 7.4.1) Screen Shots/Forms 8) System Testing 9) System Implementation 10) Conclusion 10.1) Benefits of the project 10.2) Future enhancements of the project
11) References
1
PREFACE
The evolution of electronic computers began in 1940’s. With the coming of the multiprogramming operating systems in the early 1960’s and later with the implementation and distribution the usability and efficiency of the computing machines took a big leap. Prices of hardware also decreased and awareness of computers increased substantially since their early days. With the availability of cheaper and more powerful machines, higher level languages, and more -friendly languages, the applications of computers grew rapidly. The use of computers is growing very rapidly. Now computer systems are used in such areas as business applications, scientific work, air traffic control, missile control, hospital management, airline reservations and medical diagnostic equipment. There is probably no discipline that does not use computer systems now. With this increased use of computers, the need for software is increasing- imagine the complexity of the software for the various monitoring systems. Actually, the complexity of applications and the software systems has grown much faster than our ability to deal with it.
2
INTRODUCTION The objective is to define a small mobile shop’s system for Sales and purchase of mobiles, where the detail of purchasing of mobiles of different models at which price is stored and in which price the mobiles are sold to the customers, both details are stored for the query for any mobile handsets. I include two small applications that are Notepad and Calculator, which is commonly used during the sales or purchasing. In start I introduce a form to request for the menu which holds several options for the sales and purchasing are available. This is the starting form so all other forms are connected to it by simple connection. During purchasing, I request for the model-id and its image for the recognized. This form accepts Mobile mode-id and its image to store and using this form it help to find that is same model-id is exists or not if exists then you can modify or complaint about it. After adding the Mobile model-id, you have to add the entire feature that is available in that Mobile. This form helps to add feature of Mobile through the available list of features. This form also helps to change or remove the feature of the Mobile. If any time there is needed to store and retrieve the information about the supplier then I created its solution that helps you to store supplier id and its basic information. 3
On purchasing the Mobile handsets, customer information is required then customer detail form will use. To store the information all of above I mention and generating the report I used the Ms - Access -11 versions to store and crystal report to display the report. Ms-Access providing database facilities in arranged manner and its using for the new developer are quite easy. This Access consist the multiple data tables in the one database file so multiple information is easy to access and store without using more memory. Database – To store all the questions, their answer for competition, to store all the answers by the group in each round, for printing their results I used the Ms - Access -11 versions. Ms-Access providing database facilities in arranged manner and its using for the new developer are quite easy. This Access consist the multiple data tables in the one database file so multiple information is easy to access and store without using more memory.
4
OBJECTIVES Feasibility study (System Analysis & Design) The Primary objective of this Feasibility report is to inform the about the following matters: Operational Feasibility Technical Feasibility Economical Feasibility
Non Functional Requirements Reliability: The Software starts cleanly after a crash, and it will not corrupt any persistent information (such as the records) in the event of a crash.
Maintainability:
Testing and refining has been incorporated from the very first phase of development life cycle of Mobile Shop Project, so as to make it more maintainable. Cleaned simple system documentation is provided so that the System can easily be understood and extended in further enhancements and it is easily extensible.
5
COMPUTATIONAL ENVIRONMENT Hardware Specification: There are great factor that influence the choices of hardware and software used for both development and implementation of a solution to a problem. The most prominent once being:-
Processor
RAM
Minimum:
1.6 GHz
Recommended:
2.2 GHz Pentium processor or
higher U. Minimum:
384 megabytes (MB)
Hard Disk
Recommended: 1024 MB or more RAM Up to 3.2 GB of available space may be required
DVD Drive
Required only for Installation
Display Mouse
Minimum:
1024x768 display
Recommended: 1280x1024 display Microsoft mouse or compatible pointing device
6
Software Specification:
Microsoft® Windows® 2000 or Later SP Microsoft® Windows® XP Professional x64\SP2. Operating System Microsoft® Windows® VISTA or Windows® SEVEN Install Internet Information Services (IIS). Visual Studio (Front-end)
Install .NET Framework 2.0 and .NET Framework 3.0 or later. Install Visual Studio 2008.
SQL Server
Visul studio 2010
(Back-end)
7
TOOLS, PLATFORM/LANGUAGES USED
Understanding .NET Framework applications: .NET Framework applications are built on the services of the common language runtime and take advantage of the .NET Framework class library. The documentation listed below is located in the "Development Tools and Languages" section of the MSDN Library.
Technologies and Features Provides a quick reference to the major technology areas of the .NET Framework. Provides conceptual overviews of the .NET Framework, including the common language runtime, the class library, and crosslanguage interoperability. Provides information about other technology areas in .NET Framework programming such as garbage collection, COM interlope, and threading. Security in the .NET Framework, Contains links to information on 8
the .NET Framework classes and services that enable secure application development. .NET Compact Framework, Provides information on the .NET Framework programming environment for devices.
.NET Framework Conceptual Overview Common Language Runtime explains the features and benefits of the common language runtime, a run-time environment that manages the execution of code and provides services that simplify the development process. Common Type System identifies the types ed by the common language runtime. Metadata and Self-Describing Components explain how the .NET Framework simplifies component interoperation by allowing compilers to emit additional declarative information, or metadata, into all modules and assemblies. Cross-Language Interoperability. Assemblies in the Common Language Runtime, Defines the concept of assemblies, which are collections of types and resources that form logical units of functionality. Assemblies are the fundamental units of deployment, version control, reuse, activation scoping, and security permissions.
9
Programming with Components: The designer architecture in Visual Studio lets you assemble nonvisual component classes as easily as you assemble C# forms. The following sections explain how to create your own components, and how to assemble them from the sophisticated components in the .NET Framework classes. This section defines what a component is and provides an overview of .NET Framework programming concepts that are especially relevant to component programming. While the term component has many meanings, in the .NET Framework
a
component
is
a
class
that
implements
the
System.ComponentModel.IComponent interface or one that derives directly or indirectly from a class that implements this interface. The default base class
implementation
of
the
IComponent
interface
is
System.ComponentModel.Component. If you want your components and controls to be usable from other programming languages, you must author them in a Common Language Specification (CLS)-compliant language and ensure that all public and protected
are
CLS-compliant.
The
Windows
Software
Development Kit (SDK) provides compilers for four CLS-compliant languages: C#, C#, C++, and J#. For more information about the CLS, see Common Language Specification.
10
Server-based Components for .NET Framework Applications The .NET Framework includes classes for several server-based components that you can put into your applications. Using File System and Timer Components - Introduces components that respond to changes to files and directories, raise events on a schedule, or monitor and interact with Windows processes. Using Installation Components - Introduces installation components, which allow you to execute custom actions when your application is deployed. Using Messaging Components - Introduces components that interact with Microsoft Message Queuing system resources. Using System Monitoring Components- Introduces components that interact with Windows performance counters and event logs.
Understanding VISUAL STUDIO-2008 IDE:
Using Solution Explorer – Solution Explorer is an area of the integrated development environment (IDE) that contains your solution and helps you manage your 11
project files. The files are displayed in a hierarchical view, much like that of Windows Explorer. By default, Solution Explorer is located on the right side of the IDE. If Solution Explorer is not visible, you can click the View menu and then click Solution Explorer to open it. When you create a new Windows Forms application by using C# Express Edition, a Windows Application solution appears in Solution Explorer. The solution contains two nodes: My Project and Form1.visual studio, as the following diagram illustrates.
The My Project node opens the Project Designer when you doubleclick it. The Project Designer gives you access to project properties, settings, and resources. For more information, see Introduction to the Project Designer. The Form1.visual studio node is the Windows Form in your solution. You can view this file in Design view, which enables you to see the form and any controls that you have added to it. You can also view this file in the Code Editor, which enables you to see the code associated with the application you're creating.
12
Toolbox – The Toolbox is a container for all the controls that you can add to a Windows Forms application or a Windows Presentation Foundation (WPF) application. By default, the Toolbox is located on the left side of the integrated development environment (IDE). If the Toolbox is not visible, you can click the View menu, and then click Toolbox to display it. The following illustration shows the common controls in the Toolbox. Common controls in the Toolbox You can set the Toolbox to automatically hide when you're not using it, or you can set the Toolbox to always be visible in the IDE. This makes it easier for you to see all the controls while you create your application. The controls are not visible on the Toolbox when you are in the Code Editor. To add controls to your application, you can drag them directly from the Toolbox to the form.
Introduction to Windows Forms – The interface is the part of your program that s see when they run the program. A interface usually consists of a main window or form, and several controls, such as buttons, fields for entering text, and so forth. These types of C# programs are known as Windows Forms applications, and the interface is created using Windows Forms controls.
Toolbox Component – 13
Buttons – The easiest way for s to interact with your program is through buttons. For example, many programs have Exit buttons. As you saw in the previous lesson, the Button control in C# looks and behaves like a push button. The Button control also has predefined events that can be used to initiate actions such as ending a program. Buttons are, generally, rectangular controls with a raised appearance on the form. There are many properties, however, that can be set to change their appearance. The most obvious is the Text property, which determines the text displayed, and this text is displayed in the font or typeface determined by the Font property. The BackColor property determines the button's color, and the ForeColor property determines the text's color. When the clicks a button at run time, the Button raises the Click event. When an event occurs, controls run code in response to those events. You can write code that should run when the clicks the button by creating an event handler. An event handler is a method that executes when an event occurs. When a clicks a button, the button's Click event has an event handler.
14
Labels and Text Boxes – One of the easiest ways to communicate information to and receive it from s is through text. You can display text about a program's functionality, and you can receive data as text from the and use it in your program. C# provides two controls that are designed for displaying and receiving text. They are the Label and Textbox controls. The Label control is the primary control for displaying text. It appears on the form as text enclosed in a rectangular-shaped area. The color of this area is usually the same as the color of the form. Therefore, it appears as if it is just text on the form. Because a Label is primarily meant to display text, the most important properties for a Label control are the properties that control its appearance. The Text property contains the text that is displayed in the Label control. The Font property determines the display font for the text in the Text property. The ForeColor property determines the color of the text itself, and the BackColor property determines the color of the area surrounding the text.
Check Boxes and Radio Buttons – The CheckBox control consists of a text label and a box that the can select. When the clicks the box, a check mark appears in the box. If the box is clicked again, the check mark is removed. The status of the check box can be retrieved by using the CheckBox.Checked property. If the box displays a check mark, the property returns True. If no check is displayed, the property returns False. 15
Unlike check boxes, radio buttons (also known as option buttons) always work as part of a group. Selecting one radio button immediately clears all the other radio buttons in the group. Defining a group of radio buttons tells the , "Here is a set of choices from which you can choose one and only one." You can use groups of RadioButton controls to enable s to choose between exclusive options. For example, you might allow s to choose either regular sauce or spicy sauce on their pizza, but not both. Like a CheckBoxcontrol, you can get information about the status of the RadioButton control from the RadioButton.Checked property.
Creating Menus –
Menus are an easy and familiar way for s to make choices regarding your program. Common uses for menus include exposing program options, adding shortcuts for common tasks such as cut and paste, or loading and saving files. C# makes it easy to implement menus. You can use the MenuStrip control to create menus graphically. When dragged onto a form, the MenuStrip control appears as a box that contains the words "Type Here," located in the upper part of the form. You can click the box and type inside it to create the menu titles.
16
When the title for one menu item is set, additional menu items can be created underneath and to the right of the first. This allows you to extend the menu with as many additional items or sub-items as you want. When the look of your menu is complete, you can create event handlers to handle the Click events for each item.
ListBox and ComboBox Controls –
When you want to give s a list of choices, you can display the list of items in a ListBox control or a ComboBox control. A ListBox control lets you display several items at the same time, enabling s to scroll through a longer list. When a selects an item, it becomes highlighted in the list, as the following illustration shows. A ComboBox control is a combination of a text box and a list box. By default, the combo box appears as a text box, but when s click the drop-down arrow, a list appears. When a selects an item, it becomes highlighted and is visible in the default view, as the following illustration shows. The processes for adding items to list boxes and combo boxes are similar. You can use the Add method of the ListBox control and the Add method of the ComboBox control to add items.
17
1.1
Overview
Oledb has been part of the database Standard Edition since the release of Access. The Oledb classes are contained in the database package data.Oledb. Oledb allows multiple implementations to exist and be used by the same application. The API provides a mechanism for dynamically loading the correct Java packages and ing them with the Oledb Driver Manager. The Driver Manager is used as a connection factory for creating Oledb connections. Oledb connections creating and executing statements. These statements may be update statements such as SQL CREATE, INSERT, UPDATE and DELETE or they may be query statements using the SELECT statement. Additionally, stored procedures may be invoked through a statement. Update statements such as INSERT, UPDATE and DELETE return an update count that indicates how many rows were affected in the database. These statements do not return any other information. Query statements return Oledb row result set. The row result set is used to walk over the result set. Individual columns in a row are retrieved either by name or by column number. There may be any number of rows in the result set. The row result set has metadata that describes the names of the columns and their types.
A database is an organized collection of data. Today most popular database systems are relational databases. Some popular relational database
18
management systems are Microsoft SQL Server, Oracle, Sybase, My SQL, Informix etc.
RDBMS (Relational Database Management System): A Relational data model was invented by E.F. Code and is based on one simple concept i.e. Table. A RDBMS is a computer program for managing table. It has three major parts: Data that is presented as tables. Operators for manipulating tables. Integrity rules on tables.
Introduction to SQL as Back-End-Tool: A modern relational database management system can perform a wide range of tasks. It has got the following advantages – Define a database. Query the database. Add, Edit, and Delete data. Modify the structure of the database. Secure data from public access.
19
Communicate within networks. Export and Import data.
SQL Server is one such RDBMS. It provides a set of functional programs that we use as tools to build structure and perform tasks. In Access data is stored and displayed in tables. A table is a data structure that holds data in a relational database. A table comprises of rows and columns. Table can also show relationship between entities. The formal name of a table is relation, hence the name RELATIONAL DATABASE MANAGEMENT SYSTEM.
Access of Data in visual studio SQL is a structured query language that we use to communicate with server. It consists of a set of English words like SELECT, CREATE etc. The standard set of SQL command fall into the following category – Queries using select clause. Data Definition Language (DLL) commands which are for creating and alerting the structure of database.
20
INTRODUCTION TO OPERATING SYSTEM:
Windows 98 / 2000 / NT/ME/XP/ is easier to manage & configure because it is very -friendly and is GUI based operating system. The Front-End-Tool Java is a GUI application and required the O.S. who gives the platform as GUI environment.
21
DATA FLOW DIAGRAMS
A data flow diagram is graphical tool used to describe and analyze movement of data through a system. These are the central tool and the basis from which the other components are developed.
The
transformation of data from input to output, through processed, may be described logically and independently of physical components associated with the system. These are known as the logical data flow diagrams. The physical data flow diagrams show the actual implements and movement of data between people, departments and workstations. A full description of a system actually consists of a set of data flow diagrams. Using two familiar notations Yourdon, Gane and Sarson notation develops the data flow diagrams. Each component in a DFD is labeled with a descriptive name. Process is further identified with a number that will be used for identification purpose. The development of DFD’s is done in several levels. Each process in lower level diagrams can be broken down into a more detailed DFD in the next level. The lop-level diagram is often called context diagram. It consists a single process bit, which plays vital role in studying the current system. The process in the context level diagram is exploded into other process at the first level DFD.
22
The idea behind the explosion of a process into more process is that understanding at one level of detail is exploded into greater detail at the next level. This is done until further explosion is necessary and an adequate amount of detail is described for analyst to understand the process. Larry Constantine first developed the DFD as a way of expressing system requirements in a graphical from, this lead to the modular design. A DFD is also known as a “bubble Chart” has the purpose of clarifying system requirements and identifying major transformations that will become programs in system design. So it is the starting point of the design to the lowest level of detail. A DFD consists of a series of bubbles ed by data flows in the system.
23
DFD SYMBOLS: In the DFD, there are four symbols 1. A square defines a source(originator) or destination of system data 2. An arrow identifies data flow. It is the pipeline through which the information flows 3. A circle or a bubble represents a process that transforms incoming data flow into outgoing data flows. 4. An open rectangle is a data store, data at rest or a temporary repository of data.
24
Process
Entity
Data Flow
Data store
CONSTRUCTING DFD: Several rules of thumb are used in drawing DFD’s: 1. Process should be named and numbered for an easy reference. Each name should be representative of the process. 2. The direction of flow is from top to bottom and from left to right. Data traditionally flow from source to the destination although they may flow back to the source. One way to indicate this is to draw long flow line 25
back to a source. An alternative way is to repeat the source symbol as a destination. Since it is used more than once in the DFD it is marked with a short diagonal. 3. When a process is exploded into lower level details, they are numbered. 4. The names of data stores and destinations are written in capital letters. Process and dataflow names have the first letter of each work capitalized A DFD typically shows the minimum contents of data store. Each data store should contain all the data elements that flow in and out. Questionnaires should contain all the data elements that flow in and out. Missing interfaces redundancies and like is then ed for often through interviews.
SAILENT FEATURES OF DFD’s 1. The DFD shows flow of data, not of control loops and decision are controlled considerations do not appear on a DFD. 2. The DFD does not indicate the time factor involved in any process whether the dataflow take place daily, weekly, monthly or yearly. 3. The sequence of events is not brought out on the DFD. 26
TYPES OF DATA FLOW DIAGRAMS 1. Current Physical 2. Current Logical 3. New Logical 4. New Physical
CURRENT PHYSICAL: In Current Physical DFD process label include the name of people or their positions or the names of computer systems that might provide some of the overall system-processing label includes an identification of the technology used to process the data. Similarly data flows and data stores are often labels with the names of the actual physical media on which data are stored such as file folders, computer files, business forms or computer tapes.
CURRENT LOGICAL: The physical aspects at the system are removed as mush as possible so that the current system is reduced to its essence to the data and the processors that transform them regardless of actual physical form.
27
NEW LOGICAL: This is exactly like a current logical model if the were completely happy with he were completely happy with the functionality of the current system but had problems with how it was implemented typically through the new logical model will differ from current logical model while having additional functions, absolute function removal and inefficient flows recognized.
NEW PHYSICAL: The new physical represents only the physical implementation of the new system.
RULES GOVERNING THE DFD’SPROCESS
1) No process can have only outputs. 2) No process can have only inputs. If an object has only inputs than it must be a sink. 3) A process has a verb phrase label.
28
DATA STORE 1) Data cannot move directly from one data store to another data store, a process must move data. 2) Data cannot move directly from an outside source to a data store, a process, which receives, must move data from the source and place the data into data store 3) A data store has a noun phrase label.
SOURCE OR SINK The origin and /or destination of data. 1) Data cannot move direly from a source to sink it must be moved by a process, 2) A source and /or sink has a noun phrase land.
DATA FLOW 1) A Data Flow has only one direction of flow between symbols. It may flow in both directions between a process and a data store to show a read before an update.
The later is usually indicated
however by two separate arrows since these happen at different type.
29
2) A in DFD means that exactly the same data comes from any of two or more different processes data store or sink to a common location.
3) A data flow cannot go directly back to the same process it leads. There must be at least one other process that handles the data flow produce some other data flow returns the original data into the beginning process. 4) A Data flow to a data store means update (delete or change). 5) A data Flow from a data store means retrieve or use. 6) A data flow has a noun phrase label more than one data flow noun phrase can appear on a single arrow as long as all of the flows on the same arrow move together as one package.
30
DFD
31
32
SYSTEM DESIGN
33
SYSTEM DESIGN Design Methodology:-
SOFTWARE ENGINEERING PARADIGM APPLIED- (RAD-MODEL) The two design objectives continuously sought by developers are reliability and maintenance. Reliable System There are two levels of reliability. The first is meeting the right requirements. A careful and through systems study is needed to satisfy this aspect of reliability. The second level of systems reliability involves the actual working delivered to the . At this level, the systems reliability is interwoven with software engineering and development. There are three approaches to reliability. 1. Error avoidance: Prevents errors from occurring in software.
34
2. Error detection and correction: In this approach errors are recognized whenever they are encountered and correcting the error by effect of error, of the system does not fail. 3. Error tolerance: In this approach errors are recognized whenever they occur, but enables the system to keep running through degraded perform or by applying values that instruct the system to continue process. Maintenance: The key to reducing need for maintenance, while working, if possible to do essential tasks. 1. More accurately defining requirement during system development. 2. Assembling better systems documentation. 3. Using more effective methods for deg, processing, and communicating information with project team . 4. Making better use of existing tools and techniques. 5. Managing system engineering process effectively.
Output Design: One of the most important factors of an information system for the is the output the system produces. Without the quality of the output, the entire system may appear unnecessary that will make us avoid using it possibly causing it to fail. Deg the output should process the in an organized well throughout the manner. The right output must be developed while ensuring that each output element is designed so that people will find the system easy to use effectively. 35
The term output applying to information produced by an information system whether printed or displayed while deg the output we should identify the specific output that is needed to information requirements select a method to present the formation and create a document report or other formats that contains produced by the system. Types of output: Whether the output is formatted report or a simple listing of the contents of a file, a computer process will produce the output. A Report A Document A Message Retrieval from a data store Transmission from a process or system activity Directly from an output sources
Layout Design:
It is an arrangement of items on the output medium. The layouts are building a mock up of the actual reports or document, as it will appear after the system is in operation. The output layout has been designated to cover information. The outputs are presented in the appendix.
36
Input design and control: Input specifications describe the manner in which data enter the system for processing. Input design features will ensure the reliability of the systems and produce results from accurate data, or thus can be result in the production of erroneous information. The input design also determines whenever the can interact efficiently with this system.
Objectives of input design: Input design consists of developing specifications and procedures for data preparation, the steps necessary to put transaction data into a usable from for processing and data entry, the activity of data into the computer processing. The five objectives of input design are:
Controlling the amount of input Avoiding delay Avoiding error in data Avoiding extra steps Keeping the process simple
Controlling the amount of input: 37
Data preparation and data entry operation depend on people, Because labour costs are high, the cost of preparing and entering data is also high. Reducing data requirement expense. By reducing input requirement the speed of entire process from data capturing to processing to provide results to s.
Avoiding delay: The processing delay resulting from data preparation or data entry operations is called bottlenecks. Avoiding bottlenecks should be one objective of input.
Avoiding errors: Through input validation we control the errors in the input data.
Avoiding extra steps: The designer should avoid the input design that cause extra steps in processing saving or adding a single step in large number of transactions saves a lot of processing time or takes more time to process.
38
Keeping process simple: If controls are more people may feel difficult in using the systems. The best-designed system fits the people who use it in a way that is comfortable for them.
Screen Shots & Coding
39
Screen Shots Main Form
40
Purpose: This is the Main page where all the purchasing and dealing takes place .
41
Coding:
_ Partial Class Main Inherits System.Windows.Forms.Form 'Form overrides dispose to clean up the component list. <System.Diagnostics.DebuggerNonCode()> _ Protected Overrides Sub Dispose(ByVal disposing As Boolean) Try If disposing AndAlso components IsNot Nothing Then components.Dispose() End If Finally MyBase.Dispose(disposing) End Try End Sub 'Required by the Windows Form Designer Private components As System.ComponentModel.IContainer 'NOTE: The following procedure is required by the Windows Form Designer 'It can be modified using the Windows Form Designer. 'Do not modify it using the code editor.
42
<System.Diagnostics.DebuggerStepThrough()> _ Private Sub InitializeComponent() Me.components = New System.ComponentModel.Container Me.Label1 = New System.Windows.Forms.Label Me.Timer1 = New System.Windows.Forms.Timer(Me.components) Me.MenuStrip1 = New System.Windows.Forms.MenuStrip Me.DealerAndMobileDetailToolStripMenuItem = New System.Windows.Forms.ToolStripMenuItem Me.PurchaseFromDealerToolStripMenuItem = New System.Windows.Forms.ToolStripMenuItem Me.AddNewDealToolStripMenuItem = New System.Windows.Forms.ToolStripMenuItem Me.ChangeDealToolStripMenuItem = New System.Windows.Forms.ToolStripMenuItem Me.RemoveDealToolStripMenuItem = New System.Windows.Forms.ToolStripMenuItem Me.ViewPurchedDetailToolStripMenuItem = New System.Windows.Forms.ToolStripMenuItem Me.ToolStripMenuItem1 = New System.Windows.Forms.ToolStripMenuItem Me.AddFeatureToolStripMenuItem = New System.Windows.Forms.ToolStripMenuItem Me.ChangeFeatureToolStripMenuItem = New System.Windows.Forms.ToolStripMenuItem Me.ViewMobileDetailToolStripMenuItem = New System.Windows.Forms.ToolStripMenuItem
43
Me.ExitToolStripMenuItem = New System.Windows.Forms.ToolStripMenuItem Me.CustomerToolStripMenuItem = New System.Windows.Forms.ToolStripMenuItem Me.SellingToCustomerToolStripMenuItem = New System.Windows.Forms.ToolStripMenuItem Me.GetCustomerDetailToolStripMenuItem = New System.Windows.Forms.ToolStripMenuItem Me.PictureBox1 = New System.Windows.Forms.PictureBox Me.PictureBox2 = New System.Windows.Forms.PictureBox Me.PictureBox3 = New System.Windows.Forms.PictureBox Me.PictureBox4 = New System.Windows.Forms.PictureBox Me.PictureBox5 = New System.Windows.Forms.PictureBox Me.PictureBox6 = New System.Windows.Forms.PictureBox Me.MenuStrip1.SuspendLayout() CType(Me.PictureBox1, System.ComponentModel.IInitialize).BeginInit() CType(Me.PictureBox2, System.ComponentModel.IInitialize).BeginInit() CType(Me.PictureBox3, System.ComponentModel.IInitialize).BeginInit() CType(Me.PictureBox4, System.ComponentModel.IInitialize).BeginInit() CType(Me.PictureBox5, System.ComponentModel.IInitialize).BeginInit() CType(Me.PictureBox6, System.ComponentModel.IInitialize).BeginInit() 44
Me.SuspendLayout() ' 'Label1 ' Me.Label1.AutoSize = True Me.Label1.Location = New System.Drawing.Point(205, 423) Me.Label1.Name = "Label1" Me.Label1.Size = New System.Drawing.Size(39, 13) Me.Label1.TabIndex = 0 Me.Label1.Text = "Label1" ' 'Timer1 ' ' 'MenuStrip1 ' Me.MenuStrip1.Items.AddRange(New System.Windows.Forms.ToolStripItem() {Me.DealerAndMobileDetailToolStripMenuItem, Me.CustomerToolStripMenuItem}) Me.MenuStrip1.Location = New System.Drawing.Point(0, 0) Me.MenuStrip1.Name = "MenuStrip1" Me.MenuStrip1.Size = New System.Drawing.Size(606, 24) Me.MenuStrip1.TabIndex = 1 Me.MenuStrip1.Text = "MenuStrip1" ' 'DealerAndMobileDetailToolStripMenuItem 45
' Me.DealerAndMobileDetailToolStripMenuItem.DropDownItems.AddRange (New System.Windows.Forms.ToolStripItem() {Me.PurchaseFromDealerToolStripMenuItem, Me.ViewPurchedDetailToolStripMenuItem, Me.ToolStripMenuItem1, Me.ViewMobileDetailToolStripMenuItem, Me.ExitToolStripMenuItem}) Me.DealerAndMobileDetailToolStripMenuItem.Name = "DealerAndMobileDetailToolStripMenuItem" Me.DealerAndMobileDetailToolStripMenuItem.Size = New System.Drawing.Size(115, 20) Me.DealerAndMobileDetailToolStripMenuItem.Text = "Dealer and Mobile" ' 'PurchaseFromDealerToolStripMenuItem ' Me.PurchaseFromDealerToolStripMenuItem.DropDownItems.AddRange(N ew System.Windows.Forms.ToolStripItem() {Me.AddNewDealToolStripMenuItem, Me.ChangeDealToolStripMenuItem, Me.RemoveDealToolStripMenuItem}) Me.PurchaseFromDealerToolStripMenuItem.Name = "PurchaseFromDealerToolStripMenuItem" Me.PurchaseFromDealerToolStripMenuItem.Size = New System.Drawing.Size(187, 22) Me.PurchaseFromDealerToolStripMenuItem.Text = "Purchase from Dealer" 46
' 'AddNewDealToolStripMenuItem ' Me.AddNewDealToolStripMenuItem.Name = "AddNewDealToolStripMenuItem" Me.AddNewDealToolStripMenuItem.Size = New System.Drawing.Size(149, 22) Me.AddNewDealToolStripMenuItem.Text = "Add New Deal" ' 'ChangeDealToolStripMenuItem ' Me.ChangeDealToolStripMenuItem.Name = "ChangeDealToolStripMenuItem" Me.ChangeDealToolStripMenuItem.Size = New System.Drawing.Size(149, 22) Me.ChangeDealToolStripMenuItem.Text = "Change Deal" ' 'RemoveDealToolStripMenuItem ' Me.RemoveDealToolStripMenuItem.Name = "RemoveDealToolStripMenuItem" Me.RemoveDealToolStripMenuItem.Size = New System.Drawing.Size(149, 22) Me.RemoveDealToolStripMenuItem.Text = "Remove Deal" ' 'ViewPurchedDetailToolStripMenuItem ' 47
Me.ViewPurchedDetailToolStripMenuItem.Name = "ViewPurchedDetailToolStripMenuItem" Me.ViewPurchedDetailToolStripMenuItem.Size = New System.Drawing.Size(187, 22) Me.ViewPurchedDetailToolStripMenuItem.Text = "View Purched Detail" ' 'ToolStripMenuItem1 ' Me.ToolStripMenuItem1.DropDownItems.AddRange(New System.Windows.Forms.ToolStripItem() {Me.AddFeatureToolStripMenuItem, Me.ChangeFeatureToolStripMenuItem}) Me.ToolStripMenuItem1.Name = "ToolStripMenuItem1" Me.ToolStripMenuItem1.Size = New System.Drawing.Size(187, 22) Me.ToolStripMenuItem1.Text = "Mobile Detail" ' 'AddFeatureToolStripMenuItem ' Me.AddFeatureToolStripMenuItem.Name = "AddFeatureToolStripMenuItem" Me.AddFeatureToolStripMenuItem.Size = New System.Drawing.Size(157, 22) Me.AddFeatureToolStripMenuItem.Text = "Add Feature" ' 'ChangeFeatureToolStripMenuItem ' 48
Me.ChangeFeatureToolStripMenuItem.Name = "ChangeFeatureToolStripMenuItem" Me.ChangeFeatureToolStripMenuItem.Size = New System.Drawing.Size(157, 22) Me.ChangeFeatureToolStripMenuItem.Text = "Change Feature" ' 'ViewMobileDetailToolStripMenuItem ' Me.ViewMobileDetailToolStripMenuItem.Name = "ViewMobileDetailToolStripMenuItem" Me.ViewMobileDetailToolStripMenuItem.Size = New System.Drawing.Size(187, 22) Me.ViewMobileDetailToolStripMenuItem.Text = "View Mobile Detail" ' 'ExitToolStripMenuItem ' Me.ExitToolStripMenuItem.Name = "ExitToolStripMenuItem" Me.ExitToolStripMenuItem.Size = New System.Drawing.Size(187, 22) Me.ExitToolStripMenuItem.Text = "Exit" ' 'CustomerToolStripMenuItem ' Me.CustomerToolStripMenuItem.DropDownItems.AddRange(New System.Windows.Forms.ToolStripItem() {Me.SellingToCustomerToolStripMenuItem, Me.GetCustomerDetailToolStripMenuItem})
49
Me.CustomerToolStripMenuItem.Name = "CustomerToolStripMenuItem" Me.CustomerToolStripMenuItem.Size = New System.Drawing.Size(71, 20) Me.CustomerToolStripMenuItem.Text = "Customer" ' 'SellingToCustomerToolStripMenuItem ' Me.SellingToCustomerToolStripMenuItem.Name = "SellingToCustomerToolStripMenuItem" Me.SellingToCustomerToolStripMenuItem.Size = New System.Drawing.Size(180, 22) Me.SellingToCustomerToolStripMenuItem.Text = "Selling to Customer" ' 'GetCustomerDetailToolStripMenuItem ' Me.GetCustomerDetailToolStripMenuItem.Name = "GetCustomerDetailToolStripMenuItem" Me.GetCustomerDetailToolStripMenuItem.Size = New System.Drawing.Size(180, 22) Me.GetCustomerDetailToolStripMenuItem.Text = "Get Customer Detail" ' 'PictureBox1 '
50
Me.PictureBox1.BackgroundImageLayout = System.Windows.Forms.ImageLayout.Stretch Me.PictureBox1.Location = New System.Drawing.Point(13, 61) Me.PictureBox1.Name = "PictureBox1" Me.PictureBox1.Size = New System.Drawing.Size(189, 162) Me.PictureBox1.TabIndex = 2 Me.PictureBox1.TabStop = False ' 'PictureBox2 ' Me.PictureBox2.Location = New System.Drawing.Point(208, 61) Me.PictureBox2.Name = "PictureBox2" Me.PictureBox2.Size = New System.Drawing.Size(189, 162) Me.PictureBox2.TabIndex = 2 Me.PictureBox2.TabStop = False ' 'PictureBox3 ' Me.PictureBox3.Location = New System.Drawing.Point(406, 61) Me.PictureBox3.Name = "PictureBox3" Me.PictureBox3.Size = New System.Drawing.Size(189, 162) Me.PictureBox3.TabIndex = 2 Me.PictureBox3.TabStop = False ' 'PictureBox4 ' Me.PictureBox4.Location = New System.Drawing.Point(12, 247) 51
Me.PictureBox4.Name = "PictureBox4" Me.PictureBox4.Size = New System.Drawing.Size(189, 162) Me.PictureBox4.TabIndex = 2 Me.PictureBox4.TabStop = False ' 'PictureBox5 ' Me.PictureBox5.Location = New System.Drawing.Point(207, 247) Me.PictureBox5.Name = "PictureBox5" Me.PictureBox5.Size = New System.Drawing.Size(189, 162) Me.PictureBox5.TabIndex = 2 Me.PictureBox5.TabStop = False ' 'PictureBox6 ' Me.PictureBox6.Location = New System.Drawing.Point(405, 247) Me.PictureBox6.Name = "PictureBox6" Me.PictureBox6.Size = New System.Drawing.Size(189, 162) Me.PictureBox6.TabIndex = 2 Me.PictureBox6.TabStop = False ' 'Main ' Me.AutoScaleDimensions = New System.Drawing.SizeF(6.0!, 13.0!) Me.AutoScaleMode = System.Windows.Forms.AutoScaleMode.Font Me.ClientSize = New System.Drawing.Size(606, 445) Me.Controls.Add(Me.PictureBox6) 52
Me.Controls.Add(Me.PictureBox3) Me.Controls.Add(Me.PictureBox5) Me.Controls.Add(Me.PictureBox2) Me.Controls.Add(Me.PictureBox4) Me.Controls.Add(Me.PictureBox1) Me.Controls.Add(Me.Label1) Me.Controls.Add(Me.MenuStrip1) Me.MainMenuStrip = Me.MenuStrip1 Me.Name = "Main" Me.Text = "Form1" Me.MenuStrip1.ResumeLayout(False) Me.MenuStrip1.PerformLayout() CType(Me.PictureBox1, System.ComponentModel.IInitialize).EndInit() CType(Me.PictureBox2, System.ComponentModel.IInitialize).EndInit() CType(Me.PictureBox3, System.ComponentModel.IInitialize).EndInit() CType(Me.PictureBox4, System.ComponentModel.IInitialize).EndInit() CType(Me.PictureBox5, System.ComponentModel.IInitialize).EndInit() CType(Me.PictureBox6, System.ComponentModel.IInitialize).EndInit() Me.ResumeLayout(False) Me.PerformLayout()
53
End Sub Friend WithEvents Label1 As System.Windows.Forms.Label Friend WithEvents Timer1 As System.Windows.Forms.Timer Friend WithEvents MenuStrip1 As System.Windows.Forms.MenuStrip Friend WithEvents DealerAndMobileDetailToolStripMenuItem As System.Windows.Forms.ToolStripMenuItem Friend WithEvents PurchaseFromDealerToolStripMenuItem As System.Windows.Forms.ToolStripMenuItem Friend WithEvents ViewPurchedDetailToolStripMenuItem As System.Windows.Forms.ToolStripMenuItem Friend WithEvents ViewMobileDetailToolStripMenuItem As System.Windows.Forms.ToolStripMenuItem Friend WithEvents ExitToolStripMenuItem As System.Windows.Forms.ToolStripMenuItem Friend WithEvents CustomerToolStripMenuItem As System.Windows.Forms.ToolStripMenuItem Friend WithEvents SellingToCustomerToolStripMenuItem As System.Windows.Forms.ToolStripMenuItem Friend WithEvents GetCustomerDetailToolStripMenuItem As System.Windows.Forms.ToolStripMenuItem Friend WithEvents PictureBox1 As System.Windows.Forms.PictureBox Friend WithEvents PictureBox2 As System.Windows.Forms.PictureBox Friend WithEvents PictureBox3 As System.Windows.Forms.PictureBox Friend WithEvents PictureBox4 As System.Windows.Forms.PictureBox Friend WithEvents PictureBox5 As System.Windows.Forms.PictureBox Friend WithEvents PictureBox6 As System.Windows.Forms.PictureBox
54
Friend WithEvents AddNewDealToolStripMenuItem As System.Windows.Forms.ToolStripMenuItem Friend WithEvents ChangeDealToolStripMenuItem As System.Windows.Forms.ToolStripMenuItem Friend WithEvents RemoveDealToolStripMenuItem As System.Windows.Forms.ToolStripMenuItem Friend WithEvents ToolStripMenuItem1 As System.Windows.Forms.ToolStripMenuItem Friend WithEvents AddFeatureToolStripMenuItem As System.Windows.Forms.ToolStripMenuItem Friend WithEvents ChangeFeatureToolStripMenuItem As System.Windows.Forms.ToolStripMenuItem End Class Public Class Main #Region " Windows Form Designer generated code " Public Sub New() MyBase.New() 'This call is required by the Windows Form Designer. InitializeComponent() 'Add any initialization after the InitializeComponent() call End Sub 55
#End Region Private Sub Main_FormClosed(ByVal sender As Object, ByVal e As System.Windows.Forms.FormClosedEventArgs) Handles Me.FormClosed End End Sub Private Sub Main_Load(ByVal sender As System.Object, ByVal e As System.EventArgs) Handles MyBase.Load Me.StartPosition = FormStartPosition.CenterScreen Me.FormBorderStyle = Windows.Forms.FormBorderStyle.FixedToolWindow Me.Text = "My Mobile Shop" Timer1.Enabled = True PictureBox1.BackgroundImage = My.Resources.n6681 PictureBox1.BackgroundImageLayout = ImageLayout.Stretch PictureBox2.BackgroundImage = My.Resources.nokia_6670_1_ PictureBox2.BackgroundImageLayout = ImageLayout.Stretch PictureBox3.BackgroundImage = My.Resources._10006_1_ PictureBox3.BackgroundImageLayout = ImageLayout.Stretch PictureBox4.BackgroundImage = My.Resources._20140_1_ PictureBox4.BackgroundImageLayout = ImageLayout.Stretch 56
PictureBox5.BackgroundImage = My.Resources._6060 PictureBox5.BackgroundImageLayout = ImageLayout.Stretch PictureBox6.BackgroundImage = My.Resources._7610 PictureBox6.BackgroundImageLayout = ImageLayout.Stretch
End Sub Private Sub Timer1_Tick(ByVal sender As System.Object, ByVal e As System.EventArgs) Handles Timer1.Tick Label1.Text = Now End Sub
Private Sub AddNewDealToolStripMenuItem_Click(ByVal sender As System.Object, ByVal e As System.EventArgs) Handles AddNewDealToolStripMenuItem.Click dealadd.Show() Me.Hide() End Sub
57
Private Sub ChangeDealToolStripMenuItem_Click(ByVal sender As System.Object, ByVal e As System.EventArgs) Handles ChangeDealToolStripMenuItem.Click Me.Hide() dealupdate.Show() End Sub Private Sub RemoveDealToolStripMenuItem_Click(ByVal sender As System.Object, ByVal e As System.EventArgs) Handles RemoveDealToolStripMenuItem.Click Me.Hide() dealdelt.Show() End Sub Private Sub ViewPurchedDetailToolStripMenuItem_Click(ByVal sender As System.Object, ByVal e As System.EventArgs) Handles ViewPurchedDetailToolStripMenuItem.Click Me.Hide() viewbyprod.Show() End Sub
58
Private Sub AddFeatureToolStripMenuItem_Click(ByVal sender As System.Object, ByVal e As System.EventArgs) Handles AddFeatureToolStripMenuItem.Click featureadd.Show() Me.Hide() End Sub Private Sub ChangeFeatureToolStripMenuItem_Click(ByVal sender As System.Object, ByVal e As System.EventArgs) Handles ChangeFeatureToolStripMenuItem.Click featureupdate.Show() Me.Hide() End Sub Private Sub ViewMobileDetailToolStripMenuItem_Click(ByVal sender As System.Object, ByVal e As System.EventArgs) Handles ViewMobileDetailToolStripMenuItem.Click featuredetail.Show() Me.Hide() End Sub Private Sub ExitToolStripMenuItem_Click(ByVal sender As System.Object, ByVal e As System.EventArgs) Handles ExitToolStripMenuItem.Click 59
End End Sub Private Sub SellingToCustomerToolStripMenuItem_Click(ByVal sender As System.Object, ByVal e As System.EventArgs) Handles SellingToCustomerToolStripMenuItem.Click selling.Show() Me.Hide() End Sub Private Sub GetCustomerDetailToolStripMenuItem_Click(ByVal sender As System.Object, ByVal e As System.EventArgs) Handles GetCustomerDetailToolStripMenuItem.Click Getcustdet.Show() Me.Hide() End Sub End Class
Deal Add Page
60
Codeing:
_ Partial Class dealadd Inherits System.Windows.Forms.Form 'Form overrides dispose to clean up the component list. <System.Diagnostics.DebuggerNonCode()> _ Protected Overrides Sub Dispose(ByVal disposing As Boolean) Try If disposing AndAlso components IsNot Nothing Then components.Dispose() End If Finally MyBase.Dispose(disposing) End Try End Sub 'Required by the Windows Form Designer Private components As System.ComponentModel.IContainer 'NOTE: The following procedure is required by the Windows Form Designer 'It can be modified using the Windows Form Designer. 'Do not modify it using the code editor. <System.Diagnostics.DebuggerStepThrough()> _
61
Private Sub InitializeComponent() Me.Label1 = New System.Windows.Forms.Label Me.Button1 = New System.Windows.Forms.Button Me.Label2 = New System.Windows.Forms.Label Me.Label3 = New System.Windows.Forms.Label Me.Label4 = New System.Windows.Forms.Label Me.Label5 = New System.Windows.Forms.Label Me.Label6 = New System.Windows.Forms.Label Me.Label7 = New System.Windows.Forms.Label Me.TextBox1 = New System.Windows.Forms.TextBox Me.TextBox2 = New System.Windows.Forms.TextBox Me.TextBox3 = New System.Windows.Forms.TextBox Me.TextBox4 = New System.Windows.Forms.TextBox Me.TextBox5 = New System.Windows.Forms.TextBox Me.Button2 = New System.Windows.Forms.Button Me.DateTimePicker1 = New System.Windows.Forms.DateTimePicker Me.SuspendLayout() ' 'Label1 ' Me.Label1.AutoSize = True Me.Label1.Font = New System.Drawing.Font("Microsoft Sans Serif", 15.75!, System.Drawing.FontStyle.Regular, System.Drawing.GraphicsUnit.Point, CType(0, Byte)) Me.Label1.Location = New System.Drawing.Point(93, 9) Me.Label1.Name = "Label1" Me.Label1.Size = New System.Drawing.Size(77, 25) 62
Me.Label1.TabIndex = 0 Me.Label1.Text = "Label1" ' 'Button1 ' Me.Button1.Location = New System.Drawing.Point(212, 432) Me.Button1.Name = "Button1" Me.Button1.Size = New System.Drawing.Size(75, 23) Me.Button1.TabIndex = 1 Me.Button1.Text = "Button1" Me.Button1.UseVisualStyleBackColor = True ' 'Label2 ' Me.Label2.AutoSize = True Me.Label2.Location = New System.Drawing.Point(25, 82) Me.Label2.Name = "Label2" Me.Label2.Size = New System.Drawing.Size(39, 13) Me.Label2.TabIndex = 2 Me.Label2.Text = "Label2" ' 'Label3 ' Me.Label3.AutoSize = True Me.Label3.Location = New System.Drawing.Point(25, 149) Me.Label3.Name = "Label3" Me.Label3.Size = New System.Drawing.Size(39, 13) 63
Me.Label3.TabIndex = 3 Me.Label3.Text = "Label3" ' 'Label4 ' Me.Label4.AutoSize = True Me.Label4.Location = New System.Drawing.Point(25, 207) Me.Label4.Name = "Label4" Me.Label4.Size = New System.Drawing.Size(39, 13) Me.Label4.TabIndex = 4 Me.Label4.Text = "Label4" ' 'Label5 ' Me.Label5.AutoSize = True Me.Label5.Location = New System.Drawing.Point(25, 267) Me.Label5.Name = "Label5" Me.Label5.Size = New System.Drawing.Size(39, 13) Me.Label5.TabIndex = 5 Me.Label5.Text = "Label5" ' 'Label6 ' Me.Label6.AutoSize = True Me.Label6.Location = New System.Drawing.Point(25, 322) Me.Label6.Name = "Label6" Me.Label6.Size = New System.Drawing.Size(39, 13) 64
Me.Label6.TabIndex = 6 Me.Label6.Text = "Label6" ' 'Label7 ' Me.Label7.AutoSize = True Me.Label7.Location = New System.Drawing.Point(25, 379) Me.Label7.Name = "Label7" Me.Label7.Size = New System.Drawing.Size(39, 13) Me.Label7.TabIndex = 7 Me.Label7.Text = "Label7" ' 'TextBox1 ' Me.TextBox1.Location = New System.Drawing.Point(187, 79) Me.TextBox1.Name = "TextBox1" Me.TextBox1.Size = New System.Drawing.Size(100, 20) Me.TextBox1.TabIndex = 8 ' 'TextBox2 ' Me.TextBox2.Location = New System.Drawing.Point(187, 146) Me.TextBox2.Name = "TextBox2" Me.TextBox2.Size = New System.Drawing.Size(100, 20) Me.TextBox2.TabIndex = 8 ' 'TextBox3 65
' Me.TextBox3.Location = New System.Drawing.Point(187, 204) Me.TextBox3.Name = "TextBox3" Me.TextBox3.Size = New System.Drawing.Size(100, 20) Me.TextBox3.TabIndex = 8 ' 'TextBox4 ' Me.TextBox4.Location = New System.Drawing.Point(187, 264) Me.TextBox4.Name = "TextBox4" Me.TextBox4.Size = New System.Drawing.Size(100, 20) Me.TextBox4.TabIndex = 8 ' 'TextBox5 ' Me.TextBox5.Location = New System.Drawing.Point(187, 319) Me.TextBox5.Name = "TextBox5" Me.TextBox5.Size = New System.Drawing.Size(100, 20) Me.TextBox5.TabIndex = 8 ' 'Button2 ' Me.Button2.Location = New System.Drawing.Point(28, 432) Me.Button2.Name = "Button2" Me.Button2.Size = New System.Drawing.Size(75, 23) Me.Button2.TabIndex = 9 Me.Button2.Text = "Button2" 66
Me.Button2.UseVisualStyleBackColor = True ' 'DateTimePicker1 ' Me.DateTimePicker1.Format = System.Windows.Forms.DateTimePickerFormat.[Short] Me.DateTimePicker1.Location = New System.Drawing.Point(187, 364) Me.DateTimePicker1.Name = "DateTimePicker1" Me.DateTimePicker1.Size = New System.Drawing.Size(100, 20) Me.DateTimePicker1.TabIndex = 10 ' 'dealerp ' Me.AutoScaleDimensions = New System.Drawing.SizeF(6.0!, 13.0!) Me.AutoScaleMode = System.Windows.Forms.AutoScaleMode.Font Me.ClientSize = New System.Drawing.Size(362, 467) Me.Controls.Add(Me.DateTimePicker1) Me.Controls.Add(Me.Button2) Me.Controls.Add(Me.TextBox5) Me.Controls.Add(Me.TextBox4) Me.Controls.Add(Me.TextBox3) Me.Controls.Add(Me.TextBox2) Me.Controls.Add(Me.TextBox1) Me.Controls.Add(Me.Label7) Me.Controls.Add(Me.Label6) Me.Controls.Add(Me.Label5) Me.Controls.Add(Me.Label4) 67
Me.Controls.Add(Me.Label3) Me.Controls.Add(Me.Label2) Me.Controls.Add(Me.Button1) Me.Controls.Add(Me.Label1) Me.Name = "dealerp" Me.Text = "dealerp" Me.ResumeLayout(False) Me.PerformLayout() End Sub Friend WithEvents Label1 As System.Windows.Forms.Label Friend WithEvents Button1 As System.Windows.Forms.Button Friend WithEvents Label2 As System.Windows.Forms.Label Friend WithEvents Label3 As System.Windows.Forms.Label Friend WithEvents Label4 As System.Windows.Forms.Label Friend WithEvents Label5 As System.Windows.Forms.Label Friend WithEvents Label6 As System.Windows.Forms.Label Friend WithEvents Label7 As System.Windows.Forms.Label Friend WithEvents TextBox1 As System.Windows.Forms.TextBox Friend WithEvents TextBox2 As System.Windows.Forms.TextBox Friend WithEvents TextBox3 As System.Windows.Forms.TextBox Friend WithEvents TextBox4 As System.Windows.Forms.TextBox Friend WithEvents TextBox5 As System.Windows.Forms.TextBox Friend WithEvents Button2 As System.Windows.Forms.Button Friend WithEvents DateTimePicker1 As System.Windows.Forms.DateTimePicker End Class 68
Imports System.Data Imports System.Data.OleDb Public Class dealadd Dim con As OleDbConnection = New OleDbConnection("Provider=Microsoft.Jet.OLEDB.4.0;Data Source=" & Application.StartupPath & "\mshop.mdb") Dim com As OleDbCommand Dim dread As OleDbDataReader #Region " Windows Form Designer generated code " Public Sub New() MyBase.New() 'This call is required by the Windows Form Designer. InitializeComponent() 'Add any initialization after the InitializeComponent() call End Sub #End Region Private Sub dealerp_FormClosed(ByVal sender As Object, ByVal e As System.Windows.Forms.FormClosedEventArgs) Handles Me.FormClosed Me.Hide() Main.Show() 69
End Sub Private Sub dealerp_Load(ByVal sender As System.Object, ByVal e As System.EventArgs) Handles MyBase.Load Me.StartPosition = FormStartPosition.CenterScreen Me.FormBorderStyle = Windows.Forms.FormBorderStyle.FixedToolWindow Me.Text = "Purchasing from Dealer" Label1.Text = "Purchasing from Dealer"
Button1.Text = "Exit" Button2.Text = "Save Info"
Label2.Text = "Dealer ID" Label3.Text = "Mobile Company" Label4.Text = "Mobile Model Name" Label5.Text = "IMEI No." Label6.Text = "Cost" Label7.Text = "Date Of Purchase" End Sub Private Sub Button1_Click(ByVal sender As System.Object, ByVal e As System.EventArgs) Handles Button1.Click 70
Me.Hide() Main.Show() End Sub Private Sub Button2_Click(ByVal sender As System.Object, ByVal e As System.EventArgs) Handles Button2.Click If (TextBox1.Text = "") Then MessageBox.Show("Enter the Dealer Id") ElseIf (TextBox2.Text = "") Then MessageBox.Show("Enter the Mobile Company") ElseIf (TextBox3.Text = "") Then MessageBox.Show("Enter the Mobile Model Name") ElseIf (TextBox4.Text = "") Then MessageBox.Show("Enter the IMEI No.") ElseIf (TextBox5.Text = "") Then MessageBox.Show("Select Cost") Else
Try con.Open()
71
com = New OleDbCommand("Insert into dealer(did, mobcom, mobmod, mobimei, mobcost, dop) values('" & TextBox1.Text & "','" & TextBox2.Text & "','" & TextBox3.Text & "','" & TextBox4.Text & "','" & TextBox5.Text & "','" & DateTimePicker1.Text & "')", con) dread = com.ExecuteReader() MessageBox.Show("Successfully Added") Catch ex As System.Exception System.Windows.Forms.MessageBox.Show(ex.Message) Finally dread.Close() con.Close() End Try TextBox1.Text = "" TextBox2.Text = "" TextBox3.Text = "" TextBox4.Text = "" TextBox5.Text = "" DateTimePicker1.Value = Now End If End Sub End Class
72
View Complete Purchase Detail page
73
Coding :
_ Partial Class viewbyprod Inherits System.Windows.Forms.Form 'Form overrides dispose to clean up the component list. <System.Diagnostics.DebuggerNonCode()> _ Protected Overrides Sub Dispose(ByVal disposing As Boolean) Try If disposing AndAlso components IsNot Nothing Then components.Dispose() End If Finally MyBase.Dispose(disposing) End Try End Sub 'Required by the Windows Form Designer Private components As System.ComponentModel.IContainer 'NOTE: The following procedure is required by the Windows Form Designer 'It can be modified using the Windows Form Designer. 'Do not modify it using the code editor. <System.Diagnostics.DebuggerStepThrough()> _ Private Sub InitializeComponent()
74
Me.Button1 = New System.Windows.Forms.Button Me.Button3 = New System.Windows.Forms.Button Me.DataGridView1 = New System.Windows.Forms.DataGridView Me.Label1 = New System.Windows.Forms.Label CType(Me.DataGridView1, System.ComponentModel.IInitialize).BeginInit() Me.SuspendLayout() ' 'Button1 ' Me.Button1.Location = New System.Drawing.Point(12, 385) Me.Button1.Name = "Button1" Me.Button1.Size = New System.Drawing.Size(144, 48) Me.Button1.TabIndex = 0 Me.Button1.Text = "View All" Me.Button1.UseVisualStyleBackColor = True ' 'Button3 ' Me.Button3.ForeColor = System.Drawing.Color.Maroon Me.Button3.Location = New System.Drawing.Point(437, 385) Me.Button3.Name = "Button3" Me.Button3.Size = New System.Drawing.Size(144, 48) Me.Button3.TabIndex = 2 Me.Button3.Text = "&Close Window" Me.Button3.UseVisualStyleBackColor = True ' 75
'DataGridView1 ' Me.DataGridView1.AllowToAddRows = False Me.DataGridView1.AllowToDeleteRows = False Me.DataGridView1.BackgroundColor = System.Drawing.Color.FromArgb(CType(CType(255, Byte), Integer), CType(CType(224, Byte), Integer), CType(CType(192, Byte), Integer)) Me.DataGridView1.BorderStyle = System.Windows.Forms.BorderStyle.Fixed3D Me.DataGridView1.ColumnHeadersHeightSizeMode = System.Windows.Forms.DataGridViewColumnHeadersHeightSizeMode.Au toSize Me.DataGridView1.Location = New System.Drawing.Point(12, 37) Me.DataGridView1.Name = "DataGridView1" Me.DataGridView1.ReadOnly = True Me.DataGridView1.Size = New System.Drawing.Size(657, 342) Me.DataGridView1.TabIndex = 7 ' 'Label1 ' Me.Label1.AutoSize = True Me.Label1.Location = New System.Drawing.Point(278, 9) Me.Label1.Name = "Label1" Me.Label1.Size = New System.Drawing.Size(39, 13) Me.Label1.TabIndex = 9 Me.Label1.Text = "Label1" ' 76
'viewbyprod ' Me.AutoScaleDimensions = New System.Drawing.SizeF(6.0!, 13.0!) Me.AutoScaleMode = System.Windows.Forms.AutoScaleMode.Font Me.ClientSize = New System.Drawing.Size(681, 436) Me.Controls.Add(Me.Label1) Me.Controls.Add(Me.Button3) Me.Controls.Add(Me.Button1) Me.Controls.Add(Me.DataGridView1) Me.Name = "viewbyprod" Me.Text = "viewbyprod" CType(Me.DataGridView1, System.ComponentModel.IInitialize).EndInit() Me.ResumeLayout(False) Me.PerformLayout() End Sub Friend WithEvents Button1 As System.Windows.Forms.Button Friend WithEvents Button3 As System.Windows.Forms.Button Friend WithEvents DataGridView1 As System.Windows.Forms.DataGridView Friend WithEvents Label1 As System.Windows.Forms.Label End Class Imports System.Data Imports System.Data.OleDb Public Class viewbyprod 77
#Region " Windows Form Designer generated code " Public Sub New() MyBase.New() 'This call is required by the Windows Form Designer. InitializeComponent() 'Add any initialization after the InitializeComponent() call End Sub #End Region Dim con As OleDbConnection = New OleDbConnection("Provider=Microsoft.Jet.OLEDB.4.0;Data Source=" & Application.StartupPath & "\mshop.mdb") Dim com As OleDbCommand Dim adp As OleDbDataAdapter Dim dtab As DataTable Dim dread As OleDbDataReader Dim i As Integer Private Sub viewbyprod_FormClosed(ByVal sender As Object, ByVal e As System.Windows.Forms.FormClosedEventArgs) Handles Me.FormClosed Me.Hide() Main.Show() 78
End Sub Private Sub viewbyprod_Load(ByVal sender As System.Object, ByVal e As System.EventArgs) Handles MyBase.Load Me.StartPosition = FormStartPosition.CenterScreen Me.FormBorderStyle = Windows.Forms.FormBorderStyle.FixedToolWindow Me.Text = "View By Product" Label1.Text = "View All Deal" End Sub
Private Sub Button3_Click(ByVal sender As System.Object, ByVal e As System.EventArgs) Handles Button3.Click Me.Hide() Main.Show() End Sub Private Sub Button1_Click(ByVal sender As System.Object, ByVal e As System.EventArgs) Handles Button1.Click Try con.Open() com = New OleDbCommand("select did, mobcom, mobmod, mobimei, mobcost, dop from dealer ", con) 79
adp = New OleDbDataAdapter dtab = New DataTable adp.SelectCommand = com adp.Fill(dtab) DataGridView1.DataSource = dtab DataGridView1.Columns(0).HeaderText = "Dealer Id" DataGridView1.Columns(1).HeaderText = "Mobile Company" DataGridView1.Columns(2).HeaderText = "Model" DataGridView1.Columns(3).HeaderText = "IMEI" DataGridView1.Columns(4).HeaderText = "Cost" DataGridView1.Columns(5).HeaderText = "Purchase Date"
Catch ex As Exception Windows.Forms.MessageBox.Show(ex.Message) Finally con.Close() End Try End Sub
End Class
80
Add Mobile Feature Form
81
Coding:
_ Partial Class featureadd Inherits System.Windows.Forms.Form 'Form overrides dispose to clean up the component list. <System.Diagnostics.DebuggerNonCode()> _ Protected Overrides Sub Dispose(ByVal disposing As Boolean) Try If disposing AndAlso components IsNot Nothing Then components.Dispose() End If Finally MyBase.Dispose(disposing) End Try End Sub 'Required by the Windows Form Designer Private components As System.ComponentModel.IContainer 'NOTE: The following procedure is required by the Windows Form Designer 'It can be modified using the Windows Form Designer. 'Do not modify it using the code editor. 82
<System.Diagnostics.DebuggerStepThrough()> _ Private Sub InitializeComponent() Me.ComboBox1 = New System.Windows.Forms.ComboBox Me.Button2 = New System.Windows.Forms.Button Me.Label2 = New System.Windows.Forms.Label Me.Button1 = New System.Windows.Forms.Button Me.Label1 = New System.Windows.Forms.Label Me.Label7 = New System.Windows.Forms.Label Me.ComboBox2 = New System.Windows.Forms.ComboBox Me.Label3 = New System.Windows.Forms.Label Me.ComboBox3 = New System.Windows.Forms.ComboBox Me.CheckBox1 = New System.Windows.Forms.CheckBox Me.Label4 = New System.Windows.Forms.Label Me.ComboBox4 = New System.Windows.Forms.ComboBox Me.CheckBox2 = New System.Windows.Forms.CheckBox Me.Label5 = New System.Windows.Forms.Label Me.ComboBox5 = New System.Windows.Forms.ComboBox Me.CheckBox3 = New System.Windows.Forms.CheckBox Me.Label6 = New System.Windows.Forms.Label Me.ComboBox6 = New System.Windows.Forms.ComboBox Me.SuspendLayout() ' 'ComboBox1 ' Me.ComboBox1.FormattingEnabled = True Me.ComboBox1.Location = New System.Drawing.Point(13, 82) Me.ComboBox1.Name = "ComboBox1" 83
Me.ComboBox1.Size = New System.Drawing.Size(100, 21) Me.ComboBox1.TabIndex = 41 ' 'Button2 ' Me.Button2.Location = New System.Drawing.Point(13, 291) Me.Button2.Name = "Button2" Me.Button2.Size = New System.Drawing.Size(75, 23) Me.Button2.TabIndex = 40 Me.Button2.Text = "Button2" Me.Button2.UseVisualStyleBackColor = True ' 'Label2 ' Me.Label2.AutoSize = True Me.Label2.Location = New System.Drawing.Point(13, 66) Me.Label2.Name = "Label2" Me.Label2.Size = New System.Drawing.Size(39, 13) Me.Label2.TabIndex = 30 Me.Label2.Text = "Label2" ' 'Button1 ' Me.Button1.Location = New System.Drawing.Point(278, 291) Me.Button1.Name = "Button1" Me.Button1.Size = New System.Drawing.Size(75, 23) Me.Button1.TabIndex = 29 84
Me.Button1.Text = "Button1" Me.Button1.UseVisualStyleBackColor = True ' 'Label1 ' Me.Label1.AutoSize = True Me.Label1.Font = New System.Drawing.Font("Microsoft Sans Serif", 15.75!, System.Drawing.FontStyle.Regular, System.Drawing.GraphicsUnit.Point, CType(0, Byte)) Me.Label1.Location = New System.Drawing.Point(103, 17) Me.Label1.Name = "Label1" Me.Label1.Size = New System.Drawing.Size(77, 25) Me.Label1.TabIndex = 28 Me.Label1.Text = "Label1" ' 'Label7 ' Me.Label7.AutoSize = True Me.Label7.Location = New System.Drawing.Point(116, 66) Me.Label7.Name = "Label7" Me.Label7.Size = New System.Drawing.Size(39, 13) Me.Label7.TabIndex = 42 Me.Label7.Text = "Label7" ' 'ComboBox2 ' Me.ComboBox2.FormattingEnabled = True 85
Me.ComboBox2.Location = New System.Drawing.Point(119, 82) Me.ComboBox2.Name = "ComboBox2" Me.ComboBox2.Size = New System.Drawing.Size(100, 21) Me.ComboBox2.TabIndex = 41 ' 'Label3 ' Me.Label3.AutoSize = True Me.Label3.Location = New System.Drawing.Point(13, 139) Me.Label3.Name = "Label3" Me.Label3.Size = New System.Drawing.Size(35, 13) Me.Label3.TabIndex = 43 Me.Label3.Text = "Ntwrk" ' 'ComboBox3 ' Me.ComboBox3.FormattingEnabled = True Me.ComboBox3.Location = New System.Drawing.Point(79, 136) Me.ComboBox3.Name = "ComboBox3" Me.ComboBox3.Size = New System.Drawing.Size(121, 21) Me.ComboBox3.TabIndex = 44 ' 'CheckBox1 ' Me.CheckBox1.AutoSize = True Me.CheckBox1.Location = New System.Drawing.Point(253, 140) Me.CheckBox1.Name = "CheckBox1" 86
Me.CheckBox1.Size = New System.Drawing.Size(71, 17) Me.CheckBox1.TabIndex = 45 Me.CheckBox1.Text = "Bluetooth" Me.CheckBox1.UseVisualStyleBackColor = True ' 'Label4 ' Me.Label4.AutoSize = True Me.Label4.Location = New System.Drawing.Point(13, 185) Me.Label4.Name = "Label4" Me.Label4.Size = New System.Drawing.Size(43, 13) Me.Label4.TabIndex = 46 Me.Label4.Text = "Camera" ' 'ComboBox4 ' Me.ComboBox4.FormattingEnabled = True Me.ComboBox4.Location = New System.Drawing.Point(79, 182) Me.ComboBox4.Name = "ComboBox4" Me.ComboBox4.Size = New System.Drawing.Size(121, 21) Me.ComboBox4.TabIndex = 47 ' 'CheckBox2 ' Me.CheckBox2.AutoSize = True Me.CheckBox2.Location = New System.Drawing.Point(253, 181) Me.CheckBox2.Name = "CheckBox2" 87
Me.CheckBox2.Size = New System.Drawing.Size(54, 17) Me.CheckBox2.TabIndex = 48 Me.CheckBox2.Text = "Radio" Me.CheckBox2.UseVisualStyleBackColor = True ' 'Label5 ' Me.Label5.AutoSize = True Me.Label5.Location = New System.Drawing.Point(13, 233) Me.Label5.Name = "Label5" Me.Label5.Size = New System.Drawing.Size(36, 13) Me.Label5.TabIndex = 49 Me.Label5.Text = "Memo" ' 'ComboBox5 ' Me.ComboBox5.FormattingEnabled = True Me.ComboBox5.Location = New System.Drawing.Point(79, 230) Me.ComboBox5.Name = "ComboBox5" Me.ComboBox5.Size = New System.Drawing.Size(121, 21) Me.ComboBox5.TabIndex = 50 ' 'CheckBox3 ' Me.CheckBox3.AutoSize = True Me.CheckBox3.Location = New System.Drawing.Point(253, 229) Me.CheckBox3.Name = "CheckBox3" 88
Me.CheckBox3.Size = New System.Drawing.Size(44, 17) Me.CheckBox3.TabIndex = 51 Me.CheckBox3.Text = "Wifi" Me.CheckBox3.UseVisualStyleBackColor = True ' 'Label6 ' Me.Label6.AutoSize = True Me.Label6.Location = New System.Drawing.Point(250, 66) Me.Label6.Name = "Label6" Me.Label6.Size = New System.Drawing.Size(39, 13) Me.Label6.TabIndex = 52 Me.Label6.Text = "Label6" ' 'ComboBox6 ' Me.ComboBox6.FormattingEnabled = True Me.ComboBox6.Location = New System.Drawing.Point(242, 82) Me.ComboBox6.Name = "ComboBox6" Me.ComboBox6.Size = New System.Drawing.Size(121, 21) Me.ComboBox6.TabIndex = 53 ' 'featureadd ' Me.AutoScaleDimensions = New System.Drawing.SizeF(6.0!, 13.0!) Me.AutoScaleMode = System.Windows.Forms.AutoScaleMode.Font Me.ClientSize = New System.Drawing.Size(388, 333) 89
Me.Controls.Add(Me.ComboBox6) Me.Controls.Add(Me.Label6) Me.Controls.Add(Me.CheckBox3) Me.Controls.Add(Me.ComboBox5) Me.Controls.Add(Me.Label5) Me.Controls.Add(Me.CheckBox2) Me.Controls.Add(Me.ComboBox4) Me.Controls.Add(Me.Label4) Me.Controls.Add(Me.CheckBox1) Me.Controls.Add(Me.ComboBox3) Me.Controls.Add(Me.Label3) Me.Controls.Add(Me.Label7) Me.Controls.Add(Me.ComboBox2) Me.Controls.Add(Me.ComboBox1) Me.Controls.Add(Me.Button2) Me.Controls.Add(Me.Label2) Me.Controls.Add(Me.Button1) Me.Controls.Add(Me.Label1) Me.Name = "featureadd" Me.Text = "featureadd" Me.ResumeLayout(False) Me.PerformLayout() End Sub Friend WithEvents ComboBox1 As System.Windows.Forms.ComboBox Friend WithEvents Button2 As System.Windows.Forms.Button Friend WithEvents Label2 As System.Windows.Forms.Label 90
Friend WithEvents Button1 As System.Windows.Forms.Button Friend WithEvents Label1 As System.Windows.Forms.Label Friend WithEvents Label7 As System.Windows.Forms.Label Friend WithEvents ComboBox2 As System.Windows.Forms.ComboBox Friend WithEvents Label3 As System.Windows.Forms.Label Friend WithEvents ComboBox3 As System.Windows.Forms.ComboBox Friend WithEvents CheckBox1 As System.Windows.Forms.CheckBox Friend WithEvents Label4 As System.Windows.Forms.Label Friend WithEvents ComboBox4 As System.Windows.Forms.ComboBox Friend WithEvents CheckBox2 As System.Windows.Forms.CheckBox Friend WithEvents Label5 As System.Windows.Forms.Label Friend WithEvents ComboBox5 As System.Windows.Forms.ComboBox Friend WithEvents CheckBox3 As System.Windows.Forms.CheckBox Friend WithEvents Label6 As System.Windows.Forms.Label Friend WithEvents ComboBox6 As System.Windows.Forms.ComboBox End Class Imports System.Data Imports System.Data.OleDb Public Class featureadd #Region " Windows Form Designer generated code " Public Sub New() MyBase.New() 'This call is required by the Windows Form Designer. 91
InitializeComponent() 'Add any initialization after the InitializeComponent() call End Sub #End Region Dim con As OleDbConnection = New OleDbConnection("Provider=Microsoft.Jet.OLEDB.4.0;Data Source=" & Application.StartupPath & "\mshop.mdb") Dim com, com1 As OleDbCommand Dim dread As OleDbDataReader
Dim a, b, c As String Private Sub featureadd_FormClosed(ByVal sender As Object, ByVal e As System.Windows.Forms.FormClosedEventArgs) Handles Me.FormClosed Me.Hide() Main.Show() End Sub Private Sub featureadd_Load(ByVal sender As System.Object, ByVal e As System.EventArgs) Handles MyBase.Load Me.StartPosition = FormStartPosition.CenterScreen
92
Me.FormBorderStyle = Windows.Forms.FormBorderStyle.FixedToolWindow Me.Text = "Add Mobile Feature" Label1.Text = "Add Mobile Feature"
Button1.Text = "Exit" Button2.Text = "Save Feature"
Label2.Text = "Select Company" Label7.Text = "Select Model Name"
Label3.Text = "Network Type" With ComboBox3.Items .Add("CDMA") .Add("GSM") .Add("DUEL GSM SIM") .Add("CDMA + GSM") End With Label4.Text = "Camera"
93
With ComboBox4.Items .Add("No") .Add("Less then 2 MP") .Add("2 MP") .Add("3.2 MP") .Add("Greater then 3.2 MP") End With Label5.Text = "Memory Card " With ComboBox5.Items .Add("Not ") .Add("1 GB") .Add("2 GB") .Add("4 GB") .Add("8 GB") .Add("Grater then 8 GB") End With
Label6.Text = "IMEI"
Try con.Open() com = New OleDbCommand("select * from dealer", con) dread = com.ExecuteReader() 94
While dread.Read ComboBox1.Items.Add(dread("mobcom").ToString()) End While Catch ex As Exception Windows.Forms.MessageBox.Show(ex.Message) Finally dread.Close() con.Close() End Try
End Sub Private Sub Button1_Click(ByVal sender As System.Object, ByVal e As System.EventArgs) Handles Button1.Click Me.Hide() Main.Show() End Sub Private Sub ComboBox1_SelectedIndexChanged(ByVal sender As Object, ByVal e As System.EventArgs) Handles ComboBox1.SelectedIndexChanged ComboBox2.Items.Clear() ComboBox6.Items.Clear() 95
Try con.Open() com = New OleDbCommand("select mobmod from dealer where mobcom='" & ComboBox1.Text & "'", con) dread = com.ExecuteReader() While dread.Read ComboBox2.Items.Add(dread("mobmod"))
End While Catch ex As Exception MessageBox.Show(ex.Message) Finally dread.Close() con.Close() End Try
End Sub
Private Sub Button2_Click(ByVal sender As System.Object, ByVal e As System.EventArgs) Handles Button2.Click
Try 96
con.Open() If CheckBox1.Checked = True Then a = CheckBox1.Text Else a = "" End If
If CheckBox2.Checked = True Then b = CheckBox2.Text Else b = "" End If
If CheckBox3.Checked = True Then c = CheckBox3.Text Else c = "" End If com = New OleDbCommand("update dealer SET ntwork ='" & ComboBox3.Text & "', bluetooth ='" & a & "', cam ='" & ComboBox4.Text & "', radio ='" & b & "', memor ='" & ComboBox5.Text & "', wifi ='" & c & "' where mobimei ='" & ComboBox6.Text & "'", con) dread = com.ExecuteReader() 97
MessageBox.Show("New Feature Added", "Features", MessageBoxButtons.OK)
Catch ex As OleDb.OleDbException System.Windows.Forms.MessageBox.Show(ex.Message) Finally dread.Close() con.Close() End Try
CheckBox1.Checked = False CheckBox2.Checked = False CheckBox3.Checked = False End Sub Private Sub ComboBox2_SelectedIndexChanged(ByVal sender As Object, ByVal e As System.EventArgs) Handles ComboBox2.SelectedIndexChanged ComboBox6.Items.Clear() Try 98
con.Open() com1 = New OleDbCommand("select mobimei from dealer where mobmod='" & ComboBox2.Text & "'", con) dread = com1.ExecuteReader() While dread.Read ComboBox6.Items.Add(dread("mobimei")) End While Catch ex As Exception MessageBox.Show(ex.Message) Finally dread.Close() con.Close() End Try End Sub End Class
99
View Mobile Feature page
100
Coding :
_ Partial Class featuredetail Inherits System.Windows.Forms.Form 'Form overrides dispose to clean up the component list. <System.Diagnostics.DebuggerNonCode()> _ Protected Overrides Sub Dispose(ByVal disposing As Boolean) Try If disposing AndAlso components IsNot Nothing Then components.Dispose() End If Finally MyBase.Dispose(disposing) End Try End Sub 'Required by the Windows Form Designer Private components As System.ComponentModel.IContainer 'NOTE: The following procedure is required by the Windows Form Designer 'It can be modified using the Windows Form Designer. 'Do not modify it using the code editor.
101
<System.Diagnostics.DebuggerStepThrough()> _ Private Sub InitializeComponent() Me.Label1 = New System.Windows.Forms.Label Me.Button3 = New System.Windows.Forms.Button Me.Button1 = New System.Windows.Forms.Button Me.DataGridView1 = New System.Windows.Forms.DataGridView CType(Me.DataGridView1, System.ComponentModel.IInitialize).BeginInit() Me.SuspendLayout() ' 'Label1 ' Me.Label1.AutoSize = True Me.Label1.Location = New System.Drawing.Point(322, 26) Me.Label1.Name = "Label1" Me.Label1.Size = New System.Drawing.Size(39, 13) Me.Label1.TabIndex = 13 Me.Label1.Text = "Label1" ' 'Button3 ' Me.Button3.ForeColor = System.Drawing.Color.Maroon Me.Button3.Location = New System.Drawing.Point(481, 433) Me.Button3.Name = "Button3" Me.Button3.Size = New System.Drawing.Size(144, 48) Me.Button3.TabIndex = 11 Me.Button3.Text = "&Close Window" 102
Me.Button3.UseVisualStyleBackColor = True ' 'Button1 ' Me.Button1.Location = New System.Drawing.Point(39, 433) Me.Button1.Name = "Button1" Me.Button1.Size = New System.Drawing.Size(144, 48) Me.Button1.TabIndex = 10 Me.Button1.Text = "View All" Me.Button1.UseVisualStyleBackColor = True ' 'DataGridView1 ' Me.DataGridView1.AllowToAddRows = False Me.DataGridView1.AllowToDeleteRows = False Me.DataGridView1.BackgroundColor = System.Drawing.Color.FromArgb(CType(CType(255, Byte), Integer), CType(CType(224, Byte), Integer), CType(CType(192, Byte), Integer)) Me.DataGridView1.BorderStyle = System.Windows.Forms.BorderStyle.Fixed3D Me.DataGridView1.ColumnHeadersHeightSizeMode = System.Windows.Forms.DataGridViewColumnHeadersHeightSizeMode.Au toSize Me.DataGridView1.Location = New System.Drawing.Point(39, 105) Me.DataGridView1.Name = "DataGridView1" Me.DataGridView1.ReadOnly = True Me.DataGridView1.Size = New System.Drawing.Size(657, 299) 103
Me.DataGridView1.TabIndex = 12 ' 'featuredetail ' Me.AutoScaleDimensions = New System.Drawing.SizeF(6.0!, 13.0!) Me.AutoScaleMode = System.Windows.Forms.AutoScaleMode.Font Me.ClientSize = New System.Drawing.Size(735, 493) Me.Controls.Add(Me.Label1) Me.Controls.Add(Me.Button3) Me.Controls.Add(Me.Button1) Me.Controls.Add(Me.DataGridView1) Me.Name = "featuredetail" Me.Text = "featuredetail" CType(Me.DataGridView1, System.ComponentModel.IInitialize).EndInit() Me.ResumeLayout(False) Me.PerformLayout() End Sub Friend WithEvents Label1 As System.Windows.Forms.Label Friend WithEvents Button3 As System.Windows.Forms.Button Friend WithEvents Button1 As System.Windows.Forms.Button Friend WithEvents DataGridView1 As System.Windows.Forms.DataGridView End Class Imports System.Data 104
Imports System.Data.OleDb Public Class featuredetail #Region " Windows Form Designer generated code " Public Sub New() MyBase.New() 'This call is required by the Windows Form Designer. InitializeComponent() 'Add any initialization after the InitializeComponent() call End Sub #End Region Dim con As OleDbConnection = New OleDbConnection("Provider=Microsoft.Jet.OLEDB.4.0;Data Source=" & Application.StartupPath & "\mshop.mdb") Dim com As OleDbCommand Dim adp As OleDbDataAdapter Dim dtab As DataTable Dim dread As OleDbDataReader Dim i As Integer Private Sub featuredetail_FormClosed(ByVal sender As Object, ByVal e As System.Windows.Forms.FormClosedEventArgs) Handles Me.FormClosed 105
Me.Hide() Main.Show() End Sub Private Sub featuredetail_Load(ByVal sender As System.Object, ByVal e As System.EventArgs) Handles MyBase.Load Me.StartPosition = FormStartPosition.CenterScreen Me.FormBorderStyle = Windows.Forms.FormBorderStyle.FixedToolWindow Me.Text = "View Feature Detail" Label1.Text = "View Mobile Feature detail"
End Sub Private Sub Button1_Click(ByVal sender As System.Object, ByVal e As System.EventArgs) Handles Button1.Click Try con.Open() com = New OleDbCommand("select mobcom, mobmod, mobimei, mobcost, ntwork, bluetooth, cam, radio, memor, wifi from dealer ", con) adp = New OleDbDataAdapter dtab = New DataTable adp.SelectCommand = com 106
adp.Fill(dtab) DataGridView1.DataSource = dtab DataGridView1.Columns(0).HeaderText = "Mobile Company" DataGridView1.Columns(1).HeaderText = "Mobile Model" DataGridView1.Columns(2).HeaderText = "IMEI" DataGridView1.Columns(3).HeaderText = "Cost" DataGridView1.Columns(4).HeaderText = "Network Type" DataGridView1.Columns(5).HeaderText = "Bluetooth" DataGridView1.Columns(6).HeaderText = "Camera" DataGridView1.Columns(7).HeaderText = "Radio" DataGridView1.Columns(8).HeaderText = "Memory " DataGridView1.Columns(9).HeaderText = "Wifi" Catch ex As Exception Windows.Forms.MessageBox.Show(ex.Message) Finally con.Close() End Try End Sub Private Sub Button3_Click(ByVal sender As System.Object, ByVal e As System.EventArgs) Handles Button3.Click Me.Hide() Main.Show() End Sub End Class 107
Selling Form
108
Coding: Imports System.Data Imports System.Data.OleDb Public Class selling Dim con As OleDbConnection = New OleDbConnection("Provider=Microsoft.Jet.OLEDB.4.0;Data Source=" & Application.StartupPath & "\mshop.mdb") Dim com, com1, comcus As OleDbCommand Dim dread As OleDbDataReader Private Sub selling_FormClosed(ByVal sender As Object, ByVal e As System.Windows.Forms.FormClosedEventArgs) Handles Me.FormClosed Me.Hide() Main.Show() End Sub Private Sub selling_Load(ByVal sender As System.Object, ByVal e As System.EventArgs) Handles MyBase.Load Me.StartPosition = FormStartPosition.CenterScreen Me.FormBorderStyle = Windows.Forms.FormBorderStyle.FixedToolWindow Me.Text = "Mobile Selling Form"
109
Try con.Open() com = New OleDbCommand("select * from dealer", con) dread = com.ExecuteReader() While dread.Read ComboBox1.Items.Add(dread("mobcom").ToString()) End While Catch ex As Exception Windows.Forms.MessageBox.Show(ex.Message) Finally dread.Close() con.Close() End Try TextBox1.ReadOnly = True TextBox2.ReadOnly = True TextBox3.ReadOnly = True Label8.Text = "Customer Name" Label9.Text = "Customer Address" Label10.Text = "Date of Purchase" Label11.Text = "Dealer Cost" Label12.Text = "Best Buy" Label13.Text = "Total Cost" Label14.Text = " No."
110
Button2.Text = "Sell Mobile" Button1.Text = "Exit" End Sub Private Sub ComboBox1_SelectedIndexChanged(ByVal sender As Object, ByVal e As System.EventArgs) Handles ComboBox1.SelectedIndexChanged ComboBox2.Items.Clear() ComboBox6.Items.Clear() Try con.Open() com = New OleDbCommand("select mobmod from dealer where mobcom='" & ComboBox1.Text & "'", con) dread = com.ExecuteReader() While dread.Read ComboBox2.Items.Add(dread("mobmod")) End While Catch ex As Exception MessageBox.Show(ex.Message) Finally dread.Close() con.Close() End Try
End Sub
111
Private Sub ComboBox2_SelectedIndexChanged(ByVal sender As Object, ByVal e As System.EventArgs) Handles ComboBox2.SelectedIndexChanged ComboBox6.Items.Clear() Try con.Open() com1 = New OleDbCommand("select mobimei from dealer where mobmod='" & ComboBox2.Text & "'", con) dread = com1.ExecuteReader() While dread.Read ComboBox6.Items.Add(dread("mobimei")) End While Catch ex As Exception MessageBox.Show(ex.Message) Finally dread.Close() con.Close() End Try End Sub Private Sub ComboBox6_SelectedIndexChanged(ByVal sender As Object, ByVal e As System.EventArgs) Handles ComboBox6.SelectedIndexChanged Try con.Open() 112
com1 = New OleDbCommand("select * from dealer ", con) dread = com1.ExecuteReader() While dread.Read TextBox1.Text = dread("ntwork").ToString TextBox2.Text = dread("cam").ToString TextBox3.Text = dread("memor").ToString Label15.Text = dread("mobcost").ToString If dread("bluetooth") <> "" Then CheckBox1.Checked = True Else CheckBox1.Checked = False End If If dread("radio") <> "" Then CheckBox2.Checked = True Else CheckBox2.Checked = False End If If dread("wifi") <> "" Then CheckBox3.Checked = True Else CheckBox3.Checked = False End If End While 113
Catch ex As Exception MessageBox.Show(ex.Message) Finally dread.Close() con.Close() End Try End Sub Private Sub Button2_Click(ByVal sender As System.Object, ByVal e As System.EventArgs) Handles Button2.Click If (TextBox4.Text = "") Then MessageBox.Show("Enter the Customer Name Id") Else Try con.Open() com = New OleDbCommand("Insert into cust(custnam, custadd, custcon, sellimei, sellcom, sellmod, dealercost, sellbstby, selldat, totalcost) values('" & TextBox4.Text & "','" & TextBox5.Text & "','" & TextBox6.Text & "','" & ComboBox6.Text & "','" & ComboBox1.Text & "','" & ComboBox2.Text & "','" & Label15.Text & "','" & TextBox7.Text & "','" & DateTimePicker1.Text & "','" & Label16.Text & "')", con) dread = com.ExecuteReader() MessageBox.Show("Mobile Purchased") 114
Catch ex As System.Exception System.Windows.Forms.MessageBox.Show(ex.Message) Finally dread.Close() con.Close() End Try TextBox1.Text = "" TextBox2.Text = "" TextBox3.Text = "" TextBox4.Text = "" TextBox5.Text = "" DateTimePicker1.Value = Now End If End Sub Private Sub TextBox7_TextChanged(ByVal sender As System.Object, ByVal e As System.EventArgs) Handles TextBox7.TextChanged Dim tot As Integer tot = (CInt(TextBox7.Text) * 14) / 100 Label16.Text = tot + CInt(TextBox7.Text) End Sub Private Sub Button1_Click(ByVal sender As System.Object, ByVal e As System.EventArgs) Handles Button1.Click Me.Close() 115
Main.Show() End Sub End Class
TESTING Testing is a process of executing a program with the intent of finding an error. A good test case is one that has high profitability of an as-yetundiscovered error. A successful test is one that uncovers an as-yet-undiscovered error. Testing presents an interesting anomaly for the software engineers. If testing is conducted successfully it will uncover errors in the software. As a secondary benefit testing demonstrates that software Functions appear to be working according to specification. Data collected at the time of testing is a good indication of software reliability and some indication of software quality as whole.
As far as proposed software is concerned different types of testing have been performed such as Unit Testing 116
Integration Testing Validation Testing Loop Testing
Unit testing: - It is normally performed on individual module. As each module of the proposed system has been developed, the modules are being tested. Integration Testing: - It is performed after unit testing. Integration testing is a systematic technique for constructing the program structure while conducting tests to uncover errors associated with interfacing.
117
IMPLEMENTATION Implementation means to take into practice. A crucial phase in the system life cycle is the successful implementation of the new system design. Implementation includes all those activities that take place to convert from the old system to the new one. The new system may be completely new, replacing an existing manual or automated system. The proposed system is completely new system i.e. the existing system is manual. The Main Aspects of Implementation are as follows: Training Personnel Conversion Procedure Demonstration Training Personnel: Even well designed system can succeed or fail because of the way they are operated and used. Therefore the quality of training received by the person involved with the system in various capacities helps in successful implementation of Proposed System.
118
Conversion Procedure: Conversion is the process of changing from the old system to the new one. It must be properly planned and executed. Four methods are common in use, they are Parallel System Direct Conversion Pilot System Systems Phase-in For the proposed system Parallel System will be beneficial. Under this approach, s continue to operate the old system in usual manner but they will also start using the new system this method is safest one because it ensures that in case of any problems in using the new system, the organization can still fall back to the old system without loss of time and money.
Demonstration: After the system is implemented and conversion is complete, 119
demonstration of the system is given to persons directly or indirectly related with the system.
MAINTENANCE It has been estimated that maintenance of any software product usually requires much more effort than the effort necessary to develop the product. Many studies indicate that the relative effort of development of a typical system to its maintenance effort is roughly in the 40:60 ratios. Maintenance involves performing any one or more of the following three kinds of activities:
Correcting errors that were not discovered during the product development phase. This is called Corrective maintenance.
Improving the implementation of the system and enhancing the Functionality
of
the
system
according
to
the
customer’s
requirements. This is called Perfective maintenance.
Porting the software to a new environment, e.g. to a new computer or to a new operating system. This is called Adaptive maintenance.
In the proposed Loan Processing system we had done Corrective
120
maintenance and adaptive maintenance.
REFERENCES Websites:1) www.google.com 2) www.icici.com 3) www.sbhyb.com 4) www.Scribd.com
121
5.1) Hardware Requirements 5.2) Software Requirements 6) Data Flow Diagram 7) System Design 7.1) Design Methodology 7.2) Database Design 7.3.1) Data Dictionary 7.3) Form Design 7.4.1) Screen Shots/Forms 8) System Testing 9) System Implementation 10) Conclusion 10.1) Benefits of the project 10.2) Future enhancements of the project
11) References
1
PREFACE
The evolution of electronic computers began in 1940’s. With the coming of the multiprogramming operating systems in the early 1960’s and later with the implementation and distribution the usability and efficiency of the computing machines took a big leap. Prices of hardware also decreased and awareness of computers increased substantially since their early days. With the availability of cheaper and more powerful machines, higher level languages, and more -friendly languages, the applications of computers grew rapidly. The use of computers is growing very rapidly. Now computer systems are used in such areas as business applications, scientific work, air traffic control, missile control, hospital management, airline reservations and medical diagnostic equipment. There is probably no discipline that does not use computer systems now. With this increased use of computers, the need for software is increasing- imagine the complexity of the software for the various monitoring systems. Actually, the complexity of applications and the software systems has grown much faster than our ability to deal with it.
2
INTRODUCTION The objective is to define a small mobile shop’s system for Sales and purchase of mobiles, where the detail of purchasing of mobiles of different models at which price is stored and in which price the mobiles are sold to the customers, both details are stored for the query for any mobile handsets. I include two small applications that are Notepad and Calculator, which is commonly used during the sales or purchasing. In start I introduce a form to request for the menu which holds several options for the sales and purchasing are available. This is the starting form so all other forms are connected to it by simple connection. During purchasing, I request for the model-id and its image for the recognized. This form accepts Mobile mode-id and its image to store and using this form it help to find that is same model-id is exists or not if exists then you can modify or complaint about it. After adding the Mobile model-id, you have to add the entire feature that is available in that Mobile. This form helps to add feature of Mobile through the available list of features. This form also helps to change or remove the feature of the Mobile. If any time there is needed to store and retrieve the information about the supplier then I created its solution that helps you to store supplier id and its basic information. 3
On purchasing the Mobile handsets, customer information is required then customer detail form will use. To store the information all of above I mention and generating the report I used the Ms - Access -11 versions to store and crystal report to display the report. Ms-Access providing database facilities in arranged manner and its using for the new developer are quite easy. This Access consist the multiple data tables in the one database file so multiple information is easy to access and store without using more memory. Database – To store all the questions, their answer for competition, to store all the answers by the group in each round, for printing their results I used the Ms - Access -11 versions. Ms-Access providing database facilities in arranged manner and its using for the new developer are quite easy. This Access consist the multiple data tables in the one database file so multiple information is easy to access and store without using more memory.
4
OBJECTIVES Feasibility study (System Analysis & Design) The Primary objective of this Feasibility report is to inform the about the following matters: Operational Feasibility Technical Feasibility Economical Feasibility
Non Functional Requirements Reliability: The Software starts cleanly after a crash, and it will not corrupt any persistent information (such as the records) in the event of a crash.
Maintainability:
Testing and refining has been incorporated from the very first phase of development life cycle of Mobile Shop Project, so as to make it more maintainable. Cleaned simple system documentation is provided so that the System can easily be understood and extended in further enhancements and it is easily extensible.
5
COMPUTATIONAL ENVIRONMENT Hardware Specification: There are great factor that influence the choices of hardware and software used for both development and implementation of a solution to a problem. The most prominent once being:-
Processor
RAM
Minimum:
1.6 GHz
Recommended:
2.2 GHz Pentium processor or
higher U. Minimum:
384 megabytes (MB)
Hard Disk
Recommended: 1024 MB or more RAM Up to 3.2 GB of available space may be required
DVD Drive
Required only for Installation
Display Mouse
Minimum:
1024x768 display
Recommended: 1280x1024 display Microsoft mouse or compatible pointing device
6
Software Specification:
Microsoft® Windows® 2000 or Later SP Microsoft® Windows® XP Professional x64\SP2. Operating System Microsoft® Windows® VISTA or Windows® SEVEN Install Internet Information Services (IIS). Visual Studio (Front-end)
Install .NET Framework 2.0 and .NET Framework 3.0 or later. Install Visual Studio 2008.
SQL Server
Visul studio 2010
(Back-end)
7
TOOLS, PLATFORM/LANGUAGES USED
Understanding .NET Framework applications: .NET Framework applications are built on the services of the common language runtime and take advantage of the .NET Framework class library. The documentation listed below is located in the "Development Tools and Languages" section of the MSDN Library.
Technologies and Features Provides a quick reference to the major technology areas of the .NET Framework. Provides conceptual overviews of the .NET Framework, including the common language runtime, the class library, and crosslanguage interoperability. Provides information about other technology areas in .NET Framework programming such as garbage collection, COM interlope, and threading. Security in the .NET Framework, Contains links to information on 8
the .NET Framework classes and services that enable secure application development. .NET Compact Framework, Provides information on the .NET Framework programming environment for devices.
.NET Framework Conceptual Overview Common Language Runtime explains the features and benefits of the common language runtime, a run-time environment that manages the execution of code and provides services that simplify the development process. Common Type System identifies the types ed by the common language runtime. Metadata and Self-Describing Components explain how the .NET Framework simplifies component interoperation by allowing compilers to emit additional declarative information, or metadata, into all modules and assemblies. Cross-Language Interoperability. Assemblies in the Common Language Runtime, Defines the concept of assemblies, which are collections of types and resources that form logical units of functionality. Assemblies are the fundamental units of deployment, version control, reuse, activation scoping, and security permissions.
9
Programming with Components: The designer architecture in Visual Studio lets you assemble nonvisual component classes as easily as you assemble C# forms. The following sections explain how to create your own components, and how to assemble them from the sophisticated components in the .NET Framework classes. This section defines what a component is and provides an overview of .NET Framework programming concepts that are especially relevant to component programming. While the term component has many meanings, in the .NET Framework
a
component
is
a
class
that
implements
the
System.ComponentModel.IComponent interface or one that derives directly or indirectly from a class that implements this interface. The default base class
implementation
of
the
IComponent
interface
is
System.ComponentModel.Component. If you want your components and controls to be usable from other programming languages, you must author them in a Common Language Specification (CLS)-compliant language and ensure that all public and protected
are
CLS-compliant.
The
Windows
Software
Development Kit (SDK) provides compilers for four CLS-compliant languages: C#, C#, C++, and J#. For more information about the CLS, see Common Language Specification.
10
Server-based Components for .NET Framework Applications The .NET Framework includes classes for several server-based components that you can put into your applications. Using File System and Timer Components - Introduces components that respond to changes to files and directories, raise events on a schedule, or monitor and interact with Windows processes. Using Installation Components - Introduces installation components, which allow you to execute custom actions when your application is deployed. Using Messaging Components - Introduces components that interact with Microsoft Message Queuing system resources. Using System Monitoring Components- Introduces components that interact with Windows performance counters and event logs.
Understanding VISUAL STUDIO-2008 IDE:
Using Solution Explorer – Solution Explorer is an area of the integrated development environment (IDE) that contains your solution and helps you manage your 11
project files. The files are displayed in a hierarchical view, much like that of Windows Explorer. By default, Solution Explorer is located on the right side of the IDE. If Solution Explorer is not visible, you can click the View menu and then click Solution Explorer to open it. When you create a new Windows Forms application by using C# Express Edition, a Windows Application solution appears in Solution Explorer. The solution contains two nodes: My Project and Form1.visual studio, as the following diagram illustrates.
The My Project node opens the Project Designer when you doubleclick it. The Project Designer gives you access to project properties, settings, and resources. For more information, see Introduction to the Project Designer. The Form1.visual studio node is the Windows Form in your solution. You can view this file in Design view, which enables you to see the form and any controls that you have added to it. You can also view this file in the Code Editor, which enables you to see the code associated with the application you're creating.
12
Toolbox – The Toolbox is a container for all the controls that you can add to a Windows Forms application or a Windows Presentation Foundation (WPF) application. By default, the Toolbox is located on the left side of the integrated development environment (IDE). If the Toolbox is not visible, you can click the View menu, and then click Toolbox to display it. The following illustration shows the common controls in the Toolbox. Common controls in the Toolbox You can set the Toolbox to automatically hide when you're not using it, or you can set the Toolbox to always be visible in the IDE. This makes it easier for you to see all the controls while you create your application. The controls are not visible on the Toolbox when you are in the Code Editor. To add controls to your application, you can drag them directly from the Toolbox to the form.
Introduction to Windows Forms – The interface is the part of your program that s see when they run the program. A interface usually consists of a main window or form, and several controls, such as buttons, fields for entering text, and so forth. These types of C# programs are known as Windows Forms applications, and the interface is created using Windows Forms controls.
Toolbox Component – 13
Buttons – The easiest way for s to interact with your program is through buttons. For example, many programs have Exit buttons. As you saw in the previous lesson, the Button control in C# looks and behaves like a push button. The Button control also has predefined events that can be used to initiate actions such as ending a program. Buttons are, generally, rectangular controls with a raised appearance on the form. There are many properties, however, that can be set to change their appearance. The most obvious is the Text property, which determines the text displayed, and this text is displayed in the font or typeface determined by the Font property. The BackColor property determines the button's color, and the ForeColor property determines the text's color. When the clicks a button at run time, the Button raises the Click event. When an event occurs, controls run code in response to those events. You can write code that should run when the clicks the button by creating an event handler. An event handler is a method that executes when an event occurs. When a clicks a button, the button's Click event has an event handler.
14
Labels and Text Boxes – One of the easiest ways to communicate information to and receive it from s is through text. You can display text about a program's functionality, and you can receive data as text from the and use it in your program. C# provides two controls that are designed for displaying and receiving text. They are the Label and Textbox controls. The Label control is the primary control for displaying text. It appears on the form as text enclosed in a rectangular-shaped area. The color of this area is usually the same as the color of the form. Therefore, it appears as if it is just text on the form. Because a Label is primarily meant to display text, the most important properties for a Label control are the properties that control its appearance. The Text property contains the text that is displayed in the Label control. The Font property determines the display font for the text in the Text property. The ForeColor property determines the color of the text itself, and the BackColor property determines the color of the area surrounding the text.
Check Boxes and Radio Buttons – The CheckBox control consists of a text label and a box that the can select. When the clicks the box, a check mark appears in the box. If the box is clicked again, the check mark is removed. The status of the check box can be retrieved by using the CheckBox.Checked property. If the box displays a check mark, the property returns True. If no check is displayed, the property returns False. 15
Unlike check boxes, radio buttons (also known as option buttons) always work as part of a group. Selecting one radio button immediately clears all the other radio buttons in the group. Defining a group of radio buttons tells the , "Here is a set of choices from which you can choose one and only one." You can use groups of RadioButton controls to enable s to choose between exclusive options. For example, you might allow s to choose either regular sauce or spicy sauce on their pizza, but not both. Like a CheckBoxcontrol, you can get information about the status of the RadioButton control from the RadioButton.Checked property.
Creating Menus –
Menus are an easy and familiar way for s to make choices regarding your program. Common uses for menus include exposing program options, adding shortcuts for common tasks such as cut and paste, or loading and saving files. C# makes it easy to implement menus. You can use the MenuStrip control to create menus graphically. When dragged onto a form, the MenuStrip control appears as a box that contains the words "Type Here," located in the upper part of the form. You can click the box and type inside it to create the menu titles.
16
When the title for one menu item is set, additional menu items can be created underneath and to the right of the first. This allows you to extend the menu with as many additional items or sub-items as you want. When the look of your menu is complete, you can create event handlers to handle the Click events for each item.
ListBox and ComboBox Controls –
When you want to give s a list of choices, you can display the list of items in a ListBox control or a ComboBox control. A ListBox control lets you display several items at the same time, enabling s to scroll through a longer list. When a selects an item, it becomes highlighted in the list, as the following illustration shows. A ComboBox control is a combination of a text box and a list box. By default, the combo box appears as a text box, but when s click the drop-down arrow, a list appears. When a selects an item, it becomes highlighted and is visible in the default view, as the following illustration shows. The processes for adding items to list boxes and combo boxes are similar. You can use the Add method of the ListBox control and the Add method of the ComboBox control to add items.
17
1.1
Overview
Oledb has been part of the database Standard Edition since the release of Access. The Oledb classes are contained in the database package data.Oledb. Oledb allows multiple implementations to exist and be used by the same application. The API provides a mechanism for dynamically loading the correct Java packages and ing them with the Oledb Driver Manager. The Driver Manager is used as a connection factory for creating Oledb connections. Oledb connections creating and executing statements. These statements may be update statements such as SQL CREATE, INSERT, UPDATE and DELETE or they may be query statements using the SELECT statement. Additionally, stored procedures may be invoked through a statement. Update statements such as INSERT, UPDATE and DELETE return an update count that indicates how many rows were affected in the database. These statements do not return any other information. Query statements return Oledb row result set. The row result set is used to walk over the result set. Individual columns in a row are retrieved either by name or by column number. There may be any number of rows in the result set. The row result set has metadata that describes the names of the columns and their types.
A database is an organized collection of data. Today most popular database systems are relational databases. Some popular relational database
18
management systems are Microsoft SQL Server, Oracle, Sybase, My SQL, Informix etc.
RDBMS (Relational Database Management System): A Relational data model was invented by E.F. Code and is based on one simple concept i.e. Table. A RDBMS is a computer program for managing table. It has three major parts: Data that is presented as tables. Operators for manipulating tables. Integrity rules on tables.
Introduction to SQL as Back-End-Tool: A modern relational database management system can perform a wide range of tasks. It has got the following advantages – Define a database. Query the database. Add, Edit, and Delete data. Modify the structure of the database. Secure data from public access.
19
Communicate within networks. Export and Import data.
SQL Server is one such RDBMS. It provides a set of functional programs that we use as tools to build structure and perform tasks. In Access data is stored and displayed in tables. A table is a data structure that holds data in a relational database. A table comprises of rows and columns. Table can also show relationship between entities. The formal name of a table is relation, hence the name RELATIONAL DATABASE MANAGEMENT SYSTEM.
Access of Data in visual studio SQL is a structured query language that we use to communicate with server. It consists of a set of English words like SELECT, CREATE etc. The standard set of SQL command fall into the following category – Queries using select clause. Data Definition Language (DLL) commands which are for creating and alerting the structure of database.
20
INTRODUCTION TO OPERATING SYSTEM:
Windows 98 / 2000 / NT/ME/XP/ is easier to manage & configure because it is very -friendly and is GUI based operating system. The Front-End-Tool Java is a GUI application and required the O.S. who gives the platform as GUI environment.
21
DATA FLOW DIAGRAMS
A data flow diagram is graphical tool used to describe and analyze movement of data through a system. These are the central tool and the basis from which the other components are developed.
The
transformation of data from input to output, through processed, may be described logically and independently of physical components associated with the system. These are known as the logical data flow diagrams. The physical data flow diagrams show the actual implements and movement of data between people, departments and workstations. A full description of a system actually consists of a set of data flow diagrams. Using two familiar notations Yourdon, Gane and Sarson notation develops the data flow diagrams. Each component in a DFD is labeled with a descriptive name. Process is further identified with a number that will be used for identification purpose. The development of DFD’s is done in several levels. Each process in lower level diagrams can be broken down into a more detailed DFD in the next level. The lop-level diagram is often called context diagram. It consists a single process bit, which plays vital role in studying the current system. The process in the context level diagram is exploded into other process at the first level DFD.
22
The idea behind the explosion of a process into more process is that understanding at one level of detail is exploded into greater detail at the next level. This is done until further explosion is necessary and an adequate amount of detail is described for analyst to understand the process. Larry Constantine first developed the DFD as a way of expressing system requirements in a graphical from, this lead to the modular design. A DFD is also known as a “bubble Chart” has the purpose of clarifying system requirements and identifying major transformations that will become programs in system design. So it is the starting point of the design to the lowest level of detail. A DFD consists of a series of bubbles ed by data flows in the system.
23
DFD SYMBOLS: In the DFD, there are four symbols 1. A square defines a source(originator) or destination of system data 2. An arrow identifies data flow. It is the pipeline through which the information flows 3. A circle or a bubble represents a process that transforms incoming data flow into outgoing data flows. 4. An open rectangle is a data store, data at rest or a temporary repository of data.
24
Process
Entity
Data Flow
Data store
CONSTRUCTING DFD: Several rules of thumb are used in drawing DFD’s: 1. Process should be named and numbered for an easy reference. Each name should be representative of the process. 2. The direction of flow is from top to bottom and from left to right. Data traditionally flow from source to the destination although they may flow back to the source. One way to indicate this is to draw long flow line 25
back to a source. An alternative way is to repeat the source symbol as a destination. Since it is used more than once in the DFD it is marked with a short diagonal. 3. When a process is exploded into lower level details, they are numbered. 4. The names of data stores and destinations are written in capital letters. Process and dataflow names have the first letter of each work capitalized A DFD typically shows the minimum contents of data store. Each data store should contain all the data elements that flow in and out. Questionnaires should contain all the data elements that flow in and out. Missing interfaces redundancies and like is then ed for often through interviews.
SAILENT FEATURES OF DFD’s 1. The DFD shows flow of data, not of control loops and decision are controlled considerations do not appear on a DFD. 2. The DFD does not indicate the time factor involved in any process whether the dataflow take place daily, weekly, monthly or yearly. 3. The sequence of events is not brought out on the DFD. 26
TYPES OF DATA FLOW DIAGRAMS 1. Current Physical 2. Current Logical 3. New Logical 4. New Physical
CURRENT PHYSICAL: In Current Physical DFD process label include the name of people or their positions or the names of computer systems that might provide some of the overall system-processing label includes an identification of the technology used to process the data. Similarly data flows and data stores are often labels with the names of the actual physical media on which data are stored such as file folders, computer files, business forms or computer tapes.
CURRENT LOGICAL: The physical aspects at the system are removed as mush as possible so that the current system is reduced to its essence to the data and the processors that transform them regardless of actual physical form.
27
NEW LOGICAL: This is exactly like a current logical model if the were completely happy with he were completely happy with the functionality of the current system but had problems with how it was implemented typically through the new logical model will differ from current logical model while having additional functions, absolute function removal and inefficient flows recognized.
NEW PHYSICAL: The new physical represents only the physical implementation of the new system.
RULES GOVERNING THE DFD’SPROCESS
1) No process can have only outputs. 2) No process can have only inputs. If an object has only inputs than it must be a sink. 3) A process has a verb phrase label.
28
DATA STORE 1) Data cannot move directly from one data store to another data store, a process must move data. 2) Data cannot move directly from an outside source to a data store, a process, which receives, must move data from the source and place the data into data store 3) A data store has a noun phrase label.
SOURCE OR SINK The origin and /or destination of data. 1) Data cannot move direly from a source to sink it must be moved by a process, 2) A source and /or sink has a noun phrase land.
DATA FLOW 1) A Data Flow has only one direction of flow between symbols. It may flow in both directions between a process and a data store to show a read before an update.
The later is usually indicated
however by two separate arrows since these happen at different type.
29
2) A in DFD means that exactly the same data comes from any of two or more different processes data store or sink to a common location.
3) A data flow cannot go directly back to the same process it leads. There must be at least one other process that handles the data flow produce some other data flow returns the original data into the beginning process. 4) A Data flow to a data store means update (delete or change). 5) A data Flow from a data store means retrieve or use. 6) A data flow has a noun phrase label more than one data flow noun phrase can appear on a single arrow as long as all of the flows on the same arrow move together as one package.
30
DFD
31
32
SYSTEM DESIGN
33
SYSTEM DESIGN Design Methodology:-
SOFTWARE ENGINEERING PARADIGM APPLIED- (RAD-MODEL) The two design objectives continuously sought by developers are reliability and maintenance. Reliable System There are two levels of reliability. The first is meeting the right requirements. A careful and through systems study is needed to satisfy this aspect of reliability. The second level of systems reliability involves the actual working delivered to the . At this level, the systems reliability is interwoven with software engineering and development. There are three approaches to reliability. 1. Error avoidance: Prevents errors from occurring in software.
34
2. Error detection and correction: In this approach errors are recognized whenever they are encountered and correcting the error by effect of error, of the system does not fail. 3. Error tolerance: In this approach errors are recognized whenever they occur, but enables the system to keep running through degraded perform or by applying values that instruct the system to continue process. Maintenance: The key to reducing need for maintenance, while working, if possible to do essential tasks. 1. More accurately defining requirement during system development. 2. Assembling better systems documentation. 3. Using more effective methods for deg, processing, and communicating information with project team . 4. Making better use of existing tools and techniques. 5. Managing system engineering process effectively.
Output Design: One of the most important factors of an information system for the is the output the system produces. Without the quality of the output, the entire system may appear unnecessary that will make us avoid using it possibly causing it to fail. Deg the output should process the in an organized well throughout the manner. The right output must be developed while ensuring that each output element is designed so that people will find the system easy to use effectively. 35
The term output applying to information produced by an information system whether printed or displayed while deg the output we should identify the specific output that is needed to information requirements select a method to present the formation and create a document report or other formats that contains produced by the system. Types of output: Whether the output is formatted report or a simple listing of the contents of a file, a computer process will produce the output. A Report A Document A Message Retrieval from a data store Transmission from a process or system activity Directly from an output sources
Layout Design:
It is an arrangement of items on the output medium. The layouts are building a mock up of the actual reports or document, as it will appear after the system is in operation. The output layout has been designated to cover information. The outputs are presented in the appendix.
36
Input design and control: Input specifications describe the manner in which data enter the system for processing. Input design features will ensure the reliability of the systems and produce results from accurate data, or thus can be result in the production of erroneous information. The input design also determines whenever the can interact efficiently with this system.
Objectives of input design: Input design consists of developing specifications and procedures for data preparation, the steps necessary to put transaction data into a usable from for processing and data entry, the activity of data into the computer processing. The five objectives of input design are:
Controlling the amount of input Avoiding delay Avoiding error in data Avoiding extra steps Keeping the process simple
Controlling the amount of input: 37
Data preparation and data entry operation depend on people, Because labour costs are high, the cost of preparing and entering data is also high. Reducing data requirement expense. By reducing input requirement the speed of entire process from data capturing to processing to provide results to s.
Avoiding delay: The processing delay resulting from data preparation or data entry operations is called bottlenecks. Avoiding bottlenecks should be one objective of input.
Avoiding errors: Through input validation we control the errors in the input data.
Avoiding extra steps: The designer should avoid the input design that cause extra steps in processing saving or adding a single step in large number of transactions saves a lot of processing time or takes more time to process.
38
Keeping process simple: If controls are more people may feel difficult in using the systems. The best-designed system fits the people who use it in a way that is comfortable for them.
Screen Shots & Coding
39
Screen Shots Main Form
40
Purpose: This is the Main page where all the purchasing and dealing takes place .
41
Coding:
42
<System.Diagnostics.DebuggerStepThrough()> _ Private Sub InitializeComponent() Me.components = New System.ComponentModel.Container Me.Label1 = New System.Windows.Forms.Label Me.Timer1 = New System.Windows.Forms.Timer(Me.components) Me.MenuStrip1 = New System.Windows.Forms.MenuStrip Me.DealerAndMobileDetailToolStripMenuItem = New System.Windows.Forms.ToolStripMenuItem Me.PurchaseFromDealerToolStripMenuItem = New System.Windows.Forms.ToolStripMenuItem Me.AddNewDealToolStripMenuItem = New System.Windows.Forms.ToolStripMenuItem Me.ChangeDealToolStripMenuItem = New System.Windows.Forms.ToolStripMenuItem Me.RemoveDealToolStripMenuItem = New System.Windows.Forms.ToolStripMenuItem Me.ViewPurchedDetailToolStripMenuItem = New System.Windows.Forms.ToolStripMenuItem Me.ToolStripMenuItem1 = New System.Windows.Forms.ToolStripMenuItem Me.AddFeatureToolStripMenuItem = New System.Windows.Forms.ToolStripMenuItem Me.ChangeFeatureToolStripMenuItem = New System.Windows.Forms.ToolStripMenuItem Me.ViewMobileDetailToolStripMenuItem = New System.Windows.Forms.ToolStripMenuItem
43
Me.ExitToolStripMenuItem = New System.Windows.Forms.ToolStripMenuItem Me.CustomerToolStripMenuItem = New System.Windows.Forms.ToolStripMenuItem Me.SellingToCustomerToolStripMenuItem = New System.Windows.Forms.ToolStripMenuItem Me.GetCustomerDetailToolStripMenuItem = New System.Windows.Forms.ToolStripMenuItem Me.PictureBox1 = New System.Windows.Forms.PictureBox Me.PictureBox2 = New System.Windows.Forms.PictureBox Me.PictureBox3 = New System.Windows.Forms.PictureBox Me.PictureBox4 = New System.Windows.Forms.PictureBox Me.PictureBox5 = New System.Windows.Forms.PictureBox Me.PictureBox6 = New System.Windows.Forms.PictureBox Me.MenuStrip1.SuspendLayout() CType(Me.PictureBox1, System.ComponentModel.IInitialize).BeginInit() CType(Me.PictureBox2, System.ComponentModel.IInitialize).BeginInit() CType(Me.PictureBox3, System.ComponentModel.IInitialize).BeginInit() CType(Me.PictureBox4, System.ComponentModel.IInitialize).BeginInit() CType(Me.PictureBox5, System.ComponentModel.IInitialize).BeginInit() CType(Me.PictureBox6, System.ComponentModel.IInitialize).BeginInit() 44
Me.SuspendLayout() ' 'Label1 ' Me.Label1.AutoSize = True Me.Label1.Location = New System.Drawing.Point(205, 423) Me.Label1.Name = "Label1" Me.Label1.Size = New System.Drawing.Size(39, 13) Me.Label1.TabIndex = 0 Me.Label1.Text = "Label1" ' 'Timer1 ' ' 'MenuStrip1 ' Me.MenuStrip1.Items.AddRange(New System.Windows.Forms.ToolStripItem() {Me.DealerAndMobileDetailToolStripMenuItem, Me.CustomerToolStripMenuItem}) Me.MenuStrip1.Location = New System.Drawing.Point(0, 0) Me.MenuStrip1.Name = "MenuStrip1" Me.MenuStrip1.Size = New System.Drawing.Size(606, 24) Me.MenuStrip1.TabIndex = 1 Me.MenuStrip1.Text = "MenuStrip1" ' 'DealerAndMobileDetailToolStripMenuItem 45
' Me.DealerAndMobileDetailToolStripMenuItem.DropDownItems.AddRange (New System.Windows.Forms.ToolStripItem() {Me.PurchaseFromDealerToolStripMenuItem, Me.ViewPurchedDetailToolStripMenuItem, Me.ToolStripMenuItem1, Me.ViewMobileDetailToolStripMenuItem, Me.ExitToolStripMenuItem}) Me.DealerAndMobileDetailToolStripMenuItem.Name = "DealerAndMobileDetailToolStripMenuItem" Me.DealerAndMobileDetailToolStripMenuItem.Size = New System.Drawing.Size(115, 20) Me.DealerAndMobileDetailToolStripMenuItem.Text = "Dealer and Mobile" ' 'PurchaseFromDealerToolStripMenuItem ' Me.PurchaseFromDealerToolStripMenuItem.DropDownItems.AddRange(N ew System.Windows.Forms.ToolStripItem() {Me.AddNewDealToolStripMenuItem, Me.ChangeDealToolStripMenuItem, Me.RemoveDealToolStripMenuItem}) Me.PurchaseFromDealerToolStripMenuItem.Name = "PurchaseFromDealerToolStripMenuItem" Me.PurchaseFromDealerToolStripMenuItem.Size = New System.Drawing.Size(187, 22) Me.PurchaseFromDealerToolStripMenuItem.Text = "Purchase from Dealer" 46
' 'AddNewDealToolStripMenuItem ' Me.AddNewDealToolStripMenuItem.Name = "AddNewDealToolStripMenuItem" Me.AddNewDealToolStripMenuItem.Size = New System.Drawing.Size(149, 22) Me.AddNewDealToolStripMenuItem.Text = "Add New Deal" ' 'ChangeDealToolStripMenuItem ' Me.ChangeDealToolStripMenuItem.Name = "ChangeDealToolStripMenuItem" Me.ChangeDealToolStripMenuItem.Size = New System.Drawing.Size(149, 22) Me.ChangeDealToolStripMenuItem.Text = "Change Deal" ' 'RemoveDealToolStripMenuItem ' Me.RemoveDealToolStripMenuItem.Name = "RemoveDealToolStripMenuItem" Me.RemoveDealToolStripMenuItem.Size = New System.Drawing.Size(149, 22) Me.RemoveDealToolStripMenuItem.Text = "Remove Deal" ' 'ViewPurchedDetailToolStripMenuItem ' 47
Me.ViewPurchedDetailToolStripMenuItem.Name = "ViewPurchedDetailToolStripMenuItem" Me.ViewPurchedDetailToolStripMenuItem.Size = New System.Drawing.Size(187, 22) Me.ViewPurchedDetailToolStripMenuItem.Text = "View Purched Detail" ' 'ToolStripMenuItem1 ' Me.ToolStripMenuItem1.DropDownItems.AddRange(New System.Windows.Forms.ToolStripItem() {Me.AddFeatureToolStripMenuItem, Me.ChangeFeatureToolStripMenuItem}) Me.ToolStripMenuItem1.Name = "ToolStripMenuItem1" Me.ToolStripMenuItem1.Size = New System.Drawing.Size(187, 22) Me.ToolStripMenuItem1.Text = "Mobile Detail" ' 'AddFeatureToolStripMenuItem ' Me.AddFeatureToolStripMenuItem.Name = "AddFeatureToolStripMenuItem" Me.AddFeatureToolStripMenuItem.Size = New System.Drawing.Size(157, 22) Me.AddFeatureToolStripMenuItem.Text = "Add Feature" ' 'ChangeFeatureToolStripMenuItem ' 48
Me.ChangeFeatureToolStripMenuItem.Name = "ChangeFeatureToolStripMenuItem" Me.ChangeFeatureToolStripMenuItem.Size = New System.Drawing.Size(157, 22) Me.ChangeFeatureToolStripMenuItem.Text = "Change Feature" ' 'ViewMobileDetailToolStripMenuItem ' Me.ViewMobileDetailToolStripMenuItem.Name = "ViewMobileDetailToolStripMenuItem" Me.ViewMobileDetailToolStripMenuItem.Size = New System.Drawing.Size(187, 22) Me.ViewMobileDetailToolStripMenuItem.Text = "View Mobile Detail" ' 'ExitToolStripMenuItem ' Me.ExitToolStripMenuItem.Name = "ExitToolStripMenuItem" Me.ExitToolStripMenuItem.Size = New System.Drawing.Size(187, 22) Me.ExitToolStripMenuItem.Text = "Exit" ' 'CustomerToolStripMenuItem ' Me.CustomerToolStripMenuItem.DropDownItems.AddRange(New System.Windows.Forms.ToolStripItem() {Me.SellingToCustomerToolStripMenuItem, Me.GetCustomerDetailToolStripMenuItem})
49
Me.CustomerToolStripMenuItem.Name = "CustomerToolStripMenuItem" Me.CustomerToolStripMenuItem.Size = New System.Drawing.Size(71, 20) Me.CustomerToolStripMenuItem.Text = "Customer" ' 'SellingToCustomerToolStripMenuItem ' Me.SellingToCustomerToolStripMenuItem.Name = "SellingToCustomerToolStripMenuItem" Me.SellingToCustomerToolStripMenuItem.Size = New System.Drawing.Size(180, 22) Me.SellingToCustomerToolStripMenuItem.Text = "Selling to Customer" ' 'GetCustomerDetailToolStripMenuItem ' Me.GetCustomerDetailToolStripMenuItem.Name = "GetCustomerDetailToolStripMenuItem" Me.GetCustomerDetailToolStripMenuItem.Size = New System.Drawing.Size(180, 22) Me.GetCustomerDetailToolStripMenuItem.Text = "Get Customer Detail" ' 'PictureBox1 '
50
Me.PictureBox1.BackgroundImageLayout = System.Windows.Forms.ImageLayout.Stretch Me.PictureBox1.Location = New System.Drawing.Point(13, 61) Me.PictureBox1.Name = "PictureBox1" Me.PictureBox1.Size = New System.Drawing.Size(189, 162) Me.PictureBox1.TabIndex = 2 Me.PictureBox1.TabStop = False ' 'PictureBox2 ' Me.PictureBox2.Location = New System.Drawing.Point(208, 61) Me.PictureBox2.Name = "PictureBox2" Me.PictureBox2.Size = New System.Drawing.Size(189, 162) Me.PictureBox2.TabIndex = 2 Me.PictureBox2.TabStop = False ' 'PictureBox3 ' Me.PictureBox3.Location = New System.Drawing.Point(406, 61) Me.PictureBox3.Name = "PictureBox3" Me.PictureBox3.Size = New System.Drawing.Size(189, 162) Me.PictureBox3.TabIndex = 2 Me.PictureBox3.TabStop = False ' 'PictureBox4 ' Me.PictureBox4.Location = New System.Drawing.Point(12, 247) 51
Me.PictureBox4.Name = "PictureBox4" Me.PictureBox4.Size = New System.Drawing.Size(189, 162) Me.PictureBox4.TabIndex = 2 Me.PictureBox4.TabStop = False ' 'PictureBox5 ' Me.PictureBox5.Location = New System.Drawing.Point(207, 247) Me.PictureBox5.Name = "PictureBox5" Me.PictureBox5.Size = New System.Drawing.Size(189, 162) Me.PictureBox5.TabIndex = 2 Me.PictureBox5.TabStop = False ' 'PictureBox6 ' Me.PictureBox6.Location = New System.Drawing.Point(405, 247) Me.PictureBox6.Name = "PictureBox6" Me.PictureBox6.Size = New System.Drawing.Size(189, 162) Me.PictureBox6.TabIndex = 2 Me.PictureBox6.TabStop = False ' 'Main ' Me.AutoScaleDimensions = New System.Drawing.SizeF(6.0!, 13.0!) Me.AutoScaleMode = System.Windows.Forms.AutoScaleMode.Font Me.ClientSize = New System.Drawing.Size(606, 445) Me.Controls.Add(Me.PictureBox6) 52
Me.Controls.Add(Me.PictureBox3) Me.Controls.Add(Me.PictureBox5) Me.Controls.Add(Me.PictureBox2) Me.Controls.Add(Me.PictureBox4) Me.Controls.Add(Me.PictureBox1) Me.Controls.Add(Me.Label1) Me.Controls.Add(Me.MenuStrip1) Me.MainMenuStrip = Me.MenuStrip1 Me.Name = "Main" Me.Text = "Form1" Me.MenuStrip1.ResumeLayout(False) Me.MenuStrip1.PerformLayout() CType(Me.PictureBox1, System.ComponentModel.IInitialize).EndInit() CType(Me.PictureBox2, System.ComponentModel.IInitialize).EndInit() CType(Me.PictureBox3, System.ComponentModel.IInitialize).EndInit() CType(Me.PictureBox4, System.ComponentModel.IInitialize).EndInit() CType(Me.PictureBox5, System.ComponentModel.IInitialize).EndInit() CType(Me.PictureBox6, System.ComponentModel.IInitialize).EndInit() Me.ResumeLayout(False) Me.PerformLayout()
53
End Sub Friend WithEvents Label1 As System.Windows.Forms.Label Friend WithEvents Timer1 As System.Windows.Forms.Timer Friend WithEvents MenuStrip1 As System.Windows.Forms.MenuStrip Friend WithEvents DealerAndMobileDetailToolStripMenuItem As System.Windows.Forms.ToolStripMenuItem Friend WithEvents PurchaseFromDealerToolStripMenuItem As System.Windows.Forms.ToolStripMenuItem Friend WithEvents ViewPurchedDetailToolStripMenuItem As System.Windows.Forms.ToolStripMenuItem Friend WithEvents ViewMobileDetailToolStripMenuItem As System.Windows.Forms.ToolStripMenuItem Friend WithEvents ExitToolStripMenuItem As System.Windows.Forms.ToolStripMenuItem Friend WithEvents CustomerToolStripMenuItem As System.Windows.Forms.ToolStripMenuItem Friend WithEvents SellingToCustomerToolStripMenuItem As System.Windows.Forms.ToolStripMenuItem Friend WithEvents GetCustomerDetailToolStripMenuItem As System.Windows.Forms.ToolStripMenuItem Friend WithEvents PictureBox1 As System.Windows.Forms.PictureBox Friend WithEvents PictureBox2 As System.Windows.Forms.PictureBox Friend WithEvents PictureBox3 As System.Windows.Forms.PictureBox Friend WithEvents PictureBox4 As System.Windows.Forms.PictureBox Friend WithEvents PictureBox5 As System.Windows.Forms.PictureBox Friend WithEvents PictureBox6 As System.Windows.Forms.PictureBox
54
Friend WithEvents AddNewDealToolStripMenuItem As System.Windows.Forms.ToolStripMenuItem Friend WithEvents ChangeDealToolStripMenuItem As System.Windows.Forms.ToolStripMenuItem Friend WithEvents RemoveDealToolStripMenuItem As System.Windows.Forms.ToolStripMenuItem Friend WithEvents ToolStripMenuItem1 As System.Windows.Forms.ToolStripMenuItem Friend WithEvents AddFeatureToolStripMenuItem As System.Windows.Forms.ToolStripMenuItem Friend WithEvents ChangeFeatureToolStripMenuItem As System.Windows.Forms.ToolStripMenuItem End Class Public Class Main #Region " Windows Form Designer generated code " Public Sub New() MyBase.New() 'This call is required by the Windows Form Designer. InitializeComponent() 'Add any initialization after the InitializeComponent() call End Sub 55
#End Region Private Sub Main_FormClosed(ByVal sender As Object, ByVal e As System.Windows.Forms.FormClosedEventArgs) Handles Me.FormClosed End End Sub Private Sub Main_Load(ByVal sender As System.Object, ByVal e As System.EventArgs) Handles MyBase.Load Me.StartPosition = FormStartPosition.CenterScreen Me.FormBorderStyle = Windows.Forms.FormBorderStyle.FixedToolWindow Me.Text = "My Mobile Shop" Timer1.Enabled = True PictureBox1.BackgroundImage = My.Resources.n6681 PictureBox1.BackgroundImageLayout = ImageLayout.Stretch PictureBox2.BackgroundImage = My.Resources.nokia_6670_1_ PictureBox2.BackgroundImageLayout = ImageLayout.Stretch PictureBox3.BackgroundImage = My.Resources._10006_1_ PictureBox3.BackgroundImageLayout = ImageLayout.Stretch PictureBox4.BackgroundImage = My.Resources._20140_1_ PictureBox4.BackgroundImageLayout = ImageLayout.Stretch 56
PictureBox5.BackgroundImage = My.Resources._6060 PictureBox5.BackgroundImageLayout = ImageLayout.Stretch PictureBox6.BackgroundImage = My.Resources._7610 PictureBox6.BackgroundImageLayout = ImageLayout.Stretch
End Sub Private Sub Timer1_Tick(ByVal sender As System.Object, ByVal e As System.EventArgs) Handles Timer1.Tick Label1.Text = Now End Sub
Private Sub AddNewDealToolStripMenuItem_Click(ByVal sender As System.Object, ByVal e As System.EventArgs) Handles AddNewDealToolStripMenuItem.Click dealadd.Show() Me.Hide() End Sub
57
Private Sub ChangeDealToolStripMenuItem_Click(ByVal sender As System.Object, ByVal e As System.EventArgs) Handles ChangeDealToolStripMenuItem.Click Me.Hide() dealupdate.Show() End Sub Private Sub RemoveDealToolStripMenuItem_Click(ByVal sender As System.Object, ByVal e As System.EventArgs) Handles RemoveDealToolStripMenuItem.Click Me.Hide() dealdelt.Show() End Sub Private Sub ViewPurchedDetailToolStripMenuItem_Click(ByVal sender As System.Object, ByVal e As System.EventArgs) Handles ViewPurchedDetailToolStripMenuItem.Click Me.Hide() viewbyprod.Show() End Sub
58
Private Sub AddFeatureToolStripMenuItem_Click(ByVal sender As System.Object, ByVal e As System.EventArgs) Handles AddFeatureToolStripMenuItem.Click featureadd.Show() Me.Hide() End Sub Private Sub ChangeFeatureToolStripMenuItem_Click(ByVal sender As System.Object, ByVal e As System.EventArgs) Handles ChangeFeatureToolStripMenuItem.Click featureupdate.Show() Me.Hide() End Sub Private Sub ViewMobileDetailToolStripMenuItem_Click(ByVal sender As System.Object, ByVal e As System.EventArgs) Handles ViewMobileDetailToolStripMenuItem.Click featuredetail.Show() Me.Hide() End Sub Private Sub ExitToolStripMenuItem_Click(ByVal sender As System.Object, ByVal e As System.EventArgs) Handles ExitToolStripMenuItem.Click 59
End End Sub Private Sub SellingToCustomerToolStripMenuItem_Click(ByVal sender As System.Object, ByVal e As System.EventArgs) Handles SellingToCustomerToolStripMenuItem.Click selling.Show() Me.Hide() End Sub Private Sub GetCustomerDetailToolStripMenuItem_Click(ByVal sender As System.Object, ByVal e As System.EventArgs) Handles GetCustomerDetailToolStripMenuItem.Click Getcustdet.Show() Me.Hide() End Sub End Class
Deal Add Page
60
Codeing:
61
Private Sub InitializeComponent() Me.Label1 = New System.Windows.Forms.Label Me.Button1 = New System.Windows.Forms.Button Me.Label2 = New System.Windows.Forms.Label Me.Label3 = New System.Windows.Forms.Label Me.Label4 = New System.Windows.Forms.Label Me.Label5 = New System.Windows.Forms.Label Me.Label6 = New System.Windows.Forms.Label Me.Label7 = New System.Windows.Forms.Label Me.TextBox1 = New System.Windows.Forms.TextBox Me.TextBox2 = New System.Windows.Forms.TextBox Me.TextBox3 = New System.Windows.Forms.TextBox Me.TextBox4 = New System.Windows.Forms.TextBox Me.TextBox5 = New System.Windows.Forms.TextBox Me.Button2 = New System.Windows.Forms.Button Me.DateTimePicker1 = New System.Windows.Forms.DateTimePicker Me.SuspendLayout() ' 'Label1 ' Me.Label1.AutoSize = True Me.Label1.Font = New System.Drawing.Font("Microsoft Sans Serif", 15.75!, System.Drawing.FontStyle.Regular, System.Drawing.GraphicsUnit.Point, CType(0, Byte)) Me.Label1.Location = New System.Drawing.Point(93, 9) Me.Label1.Name = "Label1" Me.Label1.Size = New System.Drawing.Size(77, 25) 62
Me.Label1.TabIndex = 0 Me.Label1.Text = "Label1" ' 'Button1 ' Me.Button1.Location = New System.Drawing.Point(212, 432) Me.Button1.Name = "Button1" Me.Button1.Size = New System.Drawing.Size(75, 23) Me.Button1.TabIndex = 1 Me.Button1.Text = "Button1" Me.Button1.UseVisualStyleBackColor = True ' 'Label2 ' Me.Label2.AutoSize = True Me.Label2.Location = New System.Drawing.Point(25, 82) Me.Label2.Name = "Label2" Me.Label2.Size = New System.Drawing.Size(39, 13) Me.Label2.TabIndex = 2 Me.Label2.Text = "Label2" ' 'Label3 ' Me.Label3.AutoSize = True Me.Label3.Location = New System.Drawing.Point(25, 149) Me.Label3.Name = "Label3" Me.Label3.Size = New System.Drawing.Size(39, 13) 63
Me.Label3.TabIndex = 3 Me.Label3.Text = "Label3" ' 'Label4 ' Me.Label4.AutoSize = True Me.Label4.Location = New System.Drawing.Point(25, 207) Me.Label4.Name = "Label4" Me.Label4.Size = New System.Drawing.Size(39, 13) Me.Label4.TabIndex = 4 Me.Label4.Text = "Label4" ' 'Label5 ' Me.Label5.AutoSize = True Me.Label5.Location = New System.Drawing.Point(25, 267) Me.Label5.Name = "Label5" Me.Label5.Size = New System.Drawing.Size(39, 13) Me.Label5.TabIndex = 5 Me.Label5.Text = "Label5" ' 'Label6 ' Me.Label6.AutoSize = True Me.Label6.Location = New System.Drawing.Point(25, 322) Me.Label6.Name = "Label6" Me.Label6.Size = New System.Drawing.Size(39, 13) 64
Me.Label6.TabIndex = 6 Me.Label6.Text = "Label6" ' 'Label7 ' Me.Label7.AutoSize = True Me.Label7.Location = New System.Drawing.Point(25, 379) Me.Label7.Name = "Label7" Me.Label7.Size = New System.Drawing.Size(39, 13) Me.Label7.TabIndex = 7 Me.Label7.Text = "Label7" ' 'TextBox1 ' Me.TextBox1.Location = New System.Drawing.Point(187, 79) Me.TextBox1.Name = "TextBox1" Me.TextBox1.Size = New System.Drawing.Size(100, 20) Me.TextBox1.TabIndex = 8 ' 'TextBox2 ' Me.TextBox2.Location = New System.Drawing.Point(187, 146) Me.TextBox2.Name = "TextBox2" Me.TextBox2.Size = New System.Drawing.Size(100, 20) Me.TextBox2.TabIndex = 8 ' 'TextBox3 65
' Me.TextBox3.Location = New System.Drawing.Point(187, 204) Me.TextBox3.Name = "TextBox3" Me.TextBox3.Size = New System.Drawing.Size(100, 20) Me.TextBox3.TabIndex = 8 ' 'TextBox4 ' Me.TextBox4.Location = New System.Drawing.Point(187, 264) Me.TextBox4.Name = "TextBox4" Me.TextBox4.Size = New System.Drawing.Size(100, 20) Me.TextBox4.TabIndex = 8 ' 'TextBox5 ' Me.TextBox5.Location = New System.Drawing.Point(187, 319) Me.TextBox5.Name = "TextBox5" Me.TextBox5.Size = New System.Drawing.Size(100, 20) Me.TextBox5.TabIndex = 8 ' 'Button2 ' Me.Button2.Location = New System.Drawing.Point(28, 432) Me.Button2.Name = "Button2" Me.Button2.Size = New System.Drawing.Size(75, 23) Me.Button2.TabIndex = 9 Me.Button2.Text = "Button2" 66
Me.Button2.UseVisualStyleBackColor = True ' 'DateTimePicker1 ' Me.DateTimePicker1.Format = System.Windows.Forms.DateTimePickerFormat.[Short] Me.DateTimePicker1.Location = New System.Drawing.Point(187, 364) Me.DateTimePicker1.Name = "DateTimePicker1" Me.DateTimePicker1.Size = New System.Drawing.Size(100, 20) Me.DateTimePicker1.TabIndex = 10 ' 'dealerp ' Me.AutoScaleDimensions = New System.Drawing.SizeF(6.0!, 13.0!) Me.AutoScaleMode = System.Windows.Forms.AutoScaleMode.Font Me.ClientSize = New System.Drawing.Size(362, 467) Me.Controls.Add(Me.DateTimePicker1) Me.Controls.Add(Me.Button2) Me.Controls.Add(Me.TextBox5) Me.Controls.Add(Me.TextBox4) Me.Controls.Add(Me.TextBox3) Me.Controls.Add(Me.TextBox2) Me.Controls.Add(Me.TextBox1) Me.Controls.Add(Me.Label7) Me.Controls.Add(Me.Label6) Me.Controls.Add(Me.Label5) Me.Controls.Add(Me.Label4) 67
Me.Controls.Add(Me.Label3) Me.Controls.Add(Me.Label2) Me.Controls.Add(Me.Button1) Me.Controls.Add(Me.Label1) Me.Name = "dealerp" Me.Text = "dealerp" Me.ResumeLayout(False) Me.PerformLayout() End Sub Friend WithEvents Label1 As System.Windows.Forms.Label Friend WithEvents Button1 As System.Windows.Forms.Button Friend WithEvents Label2 As System.Windows.Forms.Label Friend WithEvents Label3 As System.Windows.Forms.Label Friend WithEvents Label4 As System.Windows.Forms.Label Friend WithEvents Label5 As System.Windows.Forms.Label Friend WithEvents Label6 As System.Windows.Forms.Label Friend WithEvents Label7 As System.Windows.Forms.Label Friend WithEvents TextBox1 As System.Windows.Forms.TextBox Friend WithEvents TextBox2 As System.Windows.Forms.TextBox Friend WithEvents TextBox3 As System.Windows.Forms.TextBox Friend WithEvents TextBox4 As System.Windows.Forms.TextBox Friend WithEvents TextBox5 As System.Windows.Forms.TextBox Friend WithEvents Button2 As System.Windows.Forms.Button Friend WithEvents DateTimePicker1 As System.Windows.Forms.DateTimePicker End Class 68
Imports System.Data Imports System.Data.OleDb Public Class dealadd Dim con As OleDbConnection = New OleDbConnection("Provider=Microsoft.Jet.OLEDB.4.0;Data Source=" & Application.StartupPath & "\mshop.mdb") Dim com As OleDbCommand Dim dread As OleDbDataReader #Region " Windows Form Designer generated code " Public Sub New() MyBase.New() 'This call is required by the Windows Form Designer. InitializeComponent() 'Add any initialization after the InitializeComponent() call End Sub #End Region Private Sub dealerp_FormClosed(ByVal sender As Object, ByVal e As System.Windows.Forms.FormClosedEventArgs) Handles Me.FormClosed Me.Hide() Main.Show() 69
End Sub Private Sub dealerp_Load(ByVal sender As System.Object, ByVal e As System.EventArgs) Handles MyBase.Load Me.StartPosition = FormStartPosition.CenterScreen Me.FormBorderStyle = Windows.Forms.FormBorderStyle.FixedToolWindow Me.Text = "Purchasing from Dealer" Label1.Text = "Purchasing from Dealer"
Button1.Text = "Exit" Button2.Text = "Save Info"
Label2.Text = "Dealer ID" Label3.Text = "Mobile Company" Label4.Text = "Mobile Model Name" Label5.Text = "IMEI No." Label6.Text = "Cost" Label7.Text = "Date Of Purchase" End Sub Private Sub Button1_Click(ByVal sender As System.Object, ByVal e As System.EventArgs) Handles Button1.Click 70
Me.Hide() Main.Show() End Sub Private Sub Button2_Click(ByVal sender As System.Object, ByVal e As System.EventArgs) Handles Button2.Click If (TextBox1.Text = "") Then MessageBox.Show("Enter the Dealer Id") ElseIf (TextBox2.Text = "") Then MessageBox.Show("Enter the Mobile Company") ElseIf (TextBox3.Text = "") Then MessageBox.Show("Enter the Mobile Model Name") ElseIf (TextBox4.Text = "") Then MessageBox.Show("Enter the IMEI No.") ElseIf (TextBox5.Text = "") Then MessageBox.Show("Select Cost") Else
Try con.Open()
71
com = New OleDbCommand("Insert into dealer(did, mobcom, mobmod, mobimei, mobcost, dop) values('" & TextBox1.Text & "','" & TextBox2.Text & "','" & TextBox3.Text & "','" & TextBox4.Text & "','" & TextBox5.Text & "','" & DateTimePicker1.Text & "')", con) dread = com.ExecuteReader() MessageBox.Show("Successfully Added") Catch ex As System.Exception System.Windows.Forms.MessageBox.Show(ex.Message) Finally dread.Close() con.Close() End Try TextBox1.Text = "" TextBox2.Text = "" TextBox3.Text = "" TextBox4.Text = "" TextBox5.Text = "" DateTimePicker1.Value = Now End If End Sub End Class
72
View Complete Purchase Detail page
73
Coding :
74
Me.Button1 = New System.Windows.Forms.Button Me.Button3 = New System.Windows.Forms.Button Me.DataGridView1 = New System.Windows.Forms.DataGridView Me.Label1 = New System.Windows.Forms.Label CType(Me.DataGridView1, System.ComponentModel.IInitialize).BeginInit() Me.SuspendLayout() ' 'Button1 ' Me.Button1.Location = New System.Drawing.Point(12, 385) Me.Button1.Name = "Button1" Me.Button1.Size = New System.Drawing.Size(144, 48) Me.Button1.TabIndex = 0 Me.Button1.Text = "View All" Me.Button1.UseVisualStyleBackColor = True ' 'Button3 ' Me.Button3.ForeColor = System.Drawing.Color.Maroon Me.Button3.Location = New System.Drawing.Point(437, 385) Me.Button3.Name = "Button3" Me.Button3.Size = New System.Drawing.Size(144, 48) Me.Button3.TabIndex = 2 Me.Button3.Text = "&Close Window" Me.Button3.UseVisualStyleBackColor = True ' 75
'DataGridView1 ' Me.DataGridView1.AllowToAddRows = False Me.DataGridView1.AllowToDeleteRows = False Me.DataGridView1.BackgroundColor = System.Drawing.Color.FromArgb(CType(CType(255, Byte), Integer), CType(CType(224, Byte), Integer), CType(CType(192, Byte), Integer)) Me.DataGridView1.BorderStyle = System.Windows.Forms.BorderStyle.Fixed3D Me.DataGridView1.ColumnHeadersHeightSizeMode = System.Windows.Forms.DataGridViewColumnHeadersHeightSizeMode.Au toSize Me.DataGridView1.Location = New System.Drawing.Point(12, 37) Me.DataGridView1.Name = "DataGridView1" Me.DataGridView1.ReadOnly = True Me.DataGridView1.Size = New System.Drawing.Size(657, 342) Me.DataGridView1.TabIndex = 7 ' 'Label1 ' Me.Label1.AutoSize = True Me.Label1.Location = New System.Drawing.Point(278, 9) Me.Label1.Name = "Label1" Me.Label1.Size = New System.Drawing.Size(39, 13) Me.Label1.TabIndex = 9 Me.Label1.Text = "Label1" ' 76
'viewbyprod ' Me.AutoScaleDimensions = New System.Drawing.SizeF(6.0!, 13.0!) Me.AutoScaleMode = System.Windows.Forms.AutoScaleMode.Font Me.ClientSize = New System.Drawing.Size(681, 436) Me.Controls.Add(Me.Label1) Me.Controls.Add(Me.Button3) Me.Controls.Add(Me.Button1) Me.Controls.Add(Me.DataGridView1) Me.Name = "viewbyprod" Me.Text = "viewbyprod" CType(Me.DataGridView1, System.ComponentModel.IInitialize).EndInit() Me.ResumeLayout(False) Me.PerformLayout() End Sub Friend WithEvents Button1 As System.Windows.Forms.Button Friend WithEvents Button3 As System.Windows.Forms.Button Friend WithEvents DataGridView1 As System.Windows.Forms.DataGridView Friend WithEvents Label1 As System.Windows.Forms.Label End Class Imports System.Data Imports System.Data.OleDb Public Class viewbyprod 77
#Region " Windows Form Designer generated code " Public Sub New() MyBase.New() 'This call is required by the Windows Form Designer. InitializeComponent() 'Add any initialization after the InitializeComponent() call End Sub #End Region Dim con As OleDbConnection = New OleDbConnection("Provider=Microsoft.Jet.OLEDB.4.0;Data Source=" & Application.StartupPath & "\mshop.mdb") Dim com As OleDbCommand Dim adp As OleDbDataAdapter Dim dtab As DataTable Dim dread As OleDbDataReader Dim i As Integer Private Sub viewbyprod_FormClosed(ByVal sender As Object, ByVal e As System.Windows.Forms.FormClosedEventArgs) Handles Me.FormClosed Me.Hide() Main.Show() 78
End Sub Private Sub viewbyprod_Load(ByVal sender As System.Object, ByVal e As System.EventArgs) Handles MyBase.Load Me.StartPosition = FormStartPosition.CenterScreen Me.FormBorderStyle = Windows.Forms.FormBorderStyle.FixedToolWindow Me.Text = "View By Product" Label1.Text = "View All Deal" End Sub
Private Sub Button3_Click(ByVal sender As System.Object, ByVal e As System.EventArgs) Handles Button3.Click Me.Hide() Main.Show() End Sub Private Sub Button1_Click(ByVal sender As System.Object, ByVal e As System.EventArgs) Handles Button1.Click Try con.Open() com = New OleDbCommand("select did, mobcom, mobmod, mobimei, mobcost, dop from dealer ", con) 79
adp = New OleDbDataAdapter dtab = New DataTable adp.SelectCommand = com adp.Fill(dtab) DataGridView1.DataSource = dtab DataGridView1.Columns(0).HeaderText = "Dealer Id" DataGridView1.Columns(1).HeaderText = "Mobile Company" DataGridView1.Columns(2).HeaderText = "Model" DataGridView1.Columns(3).HeaderText = "IMEI" DataGridView1.Columns(4).HeaderText = "Cost" DataGridView1.Columns(5).HeaderText = "Purchase Date"
Catch ex As Exception Windows.Forms.MessageBox.Show(ex.Message) Finally con.Close() End Try End Sub
End Class
80
Add Mobile Feature Form
81
Coding:
<System.Diagnostics.DebuggerStepThrough()> _ Private Sub InitializeComponent() Me.ComboBox1 = New System.Windows.Forms.ComboBox Me.Button2 = New System.Windows.Forms.Button Me.Label2 = New System.Windows.Forms.Label Me.Button1 = New System.Windows.Forms.Button Me.Label1 = New System.Windows.Forms.Label Me.Label7 = New System.Windows.Forms.Label Me.ComboBox2 = New System.Windows.Forms.ComboBox Me.Label3 = New System.Windows.Forms.Label Me.ComboBox3 = New System.Windows.Forms.ComboBox Me.CheckBox1 = New System.Windows.Forms.CheckBox Me.Label4 = New System.Windows.Forms.Label Me.ComboBox4 = New System.Windows.Forms.ComboBox Me.CheckBox2 = New System.Windows.Forms.CheckBox Me.Label5 = New System.Windows.Forms.Label Me.ComboBox5 = New System.Windows.Forms.ComboBox Me.CheckBox3 = New System.Windows.Forms.CheckBox Me.Label6 = New System.Windows.Forms.Label Me.ComboBox6 = New System.Windows.Forms.ComboBox Me.SuspendLayout() ' 'ComboBox1 ' Me.ComboBox1.FormattingEnabled = True Me.ComboBox1.Location = New System.Drawing.Point(13, 82) Me.ComboBox1.Name = "ComboBox1" 83
Me.ComboBox1.Size = New System.Drawing.Size(100, 21) Me.ComboBox1.TabIndex = 41 ' 'Button2 ' Me.Button2.Location = New System.Drawing.Point(13, 291) Me.Button2.Name = "Button2" Me.Button2.Size = New System.Drawing.Size(75, 23) Me.Button2.TabIndex = 40 Me.Button2.Text = "Button2" Me.Button2.UseVisualStyleBackColor = True ' 'Label2 ' Me.Label2.AutoSize = True Me.Label2.Location = New System.Drawing.Point(13, 66) Me.Label2.Name = "Label2" Me.Label2.Size = New System.Drawing.Size(39, 13) Me.Label2.TabIndex = 30 Me.Label2.Text = "Label2" ' 'Button1 ' Me.Button1.Location = New System.Drawing.Point(278, 291) Me.Button1.Name = "Button1" Me.Button1.Size = New System.Drawing.Size(75, 23) Me.Button1.TabIndex = 29 84
Me.Button1.Text = "Button1" Me.Button1.UseVisualStyleBackColor = True ' 'Label1 ' Me.Label1.AutoSize = True Me.Label1.Font = New System.Drawing.Font("Microsoft Sans Serif", 15.75!, System.Drawing.FontStyle.Regular, System.Drawing.GraphicsUnit.Point, CType(0, Byte)) Me.Label1.Location = New System.Drawing.Point(103, 17) Me.Label1.Name = "Label1" Me.Label1.Size = New System.Drawing.Size(77, 25) Me.Label1.TabIndex = 28 Me.Label1.Text = "Label1" ' 'Label7 ' Me.Label7.AutoSize = True Me.Label7.Location = New System.Drawing.Point(116, 66) Me.Label7.Name = "Label7" Me.Label7.Size = New System.Drawing.Size(39, 13) Me.Label7.TabIndex = 42 Me.Label7.Text = "Label7" ' 'ComboBox2 ' Me.ComboBox2.FormattingEnabled = True 85
Me.ComboBox2.Location = New System.Drawing.Point(119, 82) Me.ComboBox2.Name = "ComboBox2" Me.ComboBox2.Size = New System.Drawing.Size(100, 21) Me.ComboBox2.TabIndex = 41 ' 'Label3 ' Me.Label3.AutoSize = True Me.Label3.Location = New System.Drawing.Point(13, 139) Me.Label3.Name = "Label3" Me.Label3.Size = New System.Drawing.Size(35, 13) Me.Label3.TabIndex = 43 Me.Label3.Text = "Ntwrk" ' 'ComboBox3 ' Me.ComboBox3.FormattingEnabled = True Me.ComboBox3.Location = New System.Drawing.Point(79, 136) Me.ComboBox3.Name = "ComboBox3" Me.ComboBox3.Size = New System.Drawing.Size(121, 21) Me.ComboBox3.TabIndex = 44 ' 'CheckBox1 ' Me.CheckBox1.AutoSize = True Me.CheckBox1.Location = New System.Drawing.Point(253, 140) Me.CheckBox1.Name = "CheckBox1" 86
Me.CheckBox1.Size = New System.Drawing.Size(71, 17) Me.CheckBox1.TabIndex = 45 Me.CheckBox1.Text = "Bluetooth" Me.CheckBox1.UseVisualStyleBackColor = True ' 'Label4 ' Me.Label4.AutoSize = True Me.Label4.Location = New System.Drawing.Point(13, 185) Me.Label4.Name = "Label4" Me.Label4.Size = New System.Drawing.Size(43, 13) Me.Label4.TabIndex = 46 Me.Label4.Text = "Camera" ' 'ComboBox4 ' Me.ComboBox4.FormattingEnabled = True Me.ComboBox4.Location = New System.Drawing.Point(79, 182) Me.ComboBox4.Name = "ComboBox4" Me.ComboBox4.Size = New System.Drawing.Size(121, 21) Me.ComboBox4.TabIndex = 47 ' 'CheckBox2 ' Me.CheckBox2.AutoSize = True Me.CheckBox2.Location = New System.Drawing.Point(253, 181) Me.CheckBox2.Name = "CheckBox2" 87
Me.CheckBox2.Size = New System.Drawing.Size(54, 17) Me.CheckBox2.TabIndex = 48 Me.CheckBox2.Text = "Radio" Me.CheckBox2.UseVisualStyleBackColor = True ' 'Label5 ' Me.Label5.AutoSize = True Me.Label5.Location = New System.Drawing.Point(13, 233) Me.Label5.Name = "Label5" Me.Label5.Size = New System.Drawing.Size(36, 13) Me.Label5.TabIndex = 49 Me.Label5.Text = "Memo" ' 'ComboBox5 ' Me.ComboBox5.FormattingEnabled = True Me.ComboBox5.Location = New System.Drawing.Point(79, 230) Me.ComboBox5.Name = "ComboBox5" Me.ComboBox5.Size = New System.Drawing.Size(121, 21) Me.ComboBox5.TabIndex = 50 ' 'CheckBox3 ' Me.CheckBox3.AutoSize = True Me.CheckBox3.Location = New System.Drawing.Point(253, 229) Me.CheckBox3.Name = "CheckBox3" 88
Me.CheckBox3.Size = New System.Drawing.Size(44, 17) Me.CheckBox3.TabIndex = 51 Me.CheckBox3.Text = "Wifi" Me.CheckBox3.UseVisualStyleBackColor = True ' 'Label6 ' Me.Label6.AutoSize = True Me.Label6.Location = New System.Drawing.Point(250, 66) Me.Label6.Name = "Label6" Me.Label6.Size = New System.Drawing.Size(39, 13) Me.Label6.TabIndex = 52 Me.Label6.Text = "Label6" ' 'ComboBox6 ' Me.ComboBox6.FormattingEnabled = True Me.ComboBox6.Location = New System.Drawing.Point(242, 82) Me.ComboBox6.Name = "ComboBox6" Me.ComboBox6.Size = New System.Drawing.Size(121, 21) Me.ComboBox6.TabIndex = 53 ' 'featureadd ' Me.AutoScaleDimensions = New System.Drawing.SizeF(6.0!, 13.0!) Me.AutoScaleMode = System.Windows.Forms.AutoScaleMode.Font Me.ClientSize = New System.Drawing.Size(388, 333) 89
Me.Controls.Add(Me.ComboBox6) Me.Controls.Add(Me.Label6) Me.Controls.Add(Me.CheckBox3) Me.Controls.Add(Me.ComboBox5) Me.Controls.Add(Me.Label5) Me.Controls.Add(Me.CheckBox2) Me.Controls.Add(Me.ComboBox4) Me.Controls.Add(Me.Label4) Me.Controls.Add(Me.CheckBox1) Me.Controls.Add(Me.ComboBox3) Me.Controls.Add(Me.Label3) Me.Controls.Add(Me.Label7) Me.Controls.Add(Me.ComboBox2) Me.Controls.Add(Me.ComboBox1) Me.Controls.Add(Me.Button2) Me.Controls.Add(Me.Label2) Me.Controls.Add(Me.Button1) Me.Controls.Add(Me.Label1) Me.Name = "featureadd" Me.Text = "featureadd" Me.ResumeLayout(False) Me.PerformLayout() End Sub Friend WithEvents ComboBox1 As System.Windows.Forms.ComboBox Friend WithEvents Button2 As System.Windows.Forms.Button Friend WithEvents Label2 As System.Windows.Forms.Label 90
Friend WithEvents Button1 As System.Windows.Forms.Button Friend WithEvents Label1 As System.Windows.Forms.Label Friend WithEvents Label7 As System.Windows.Forms.Label Friend WithEvents ComboBox2 As System.Windows.Forms.ComboBox Friend WithEvents Label3 As System.Windows.Forms.Label Friend WithEvents ComboBox3 As System.Windows.Forms.ComboBox Friend WithEvents CheckBox1 As System.Windows.Forms.CheckBox Friend WithEvents Label4 As System.Windows.Forms.Label Friend WithEvents ComboBox4 As System.Windows.Forms.ComboBox Friend WithEvents CheckBox2 As System.Windows.Forms.CheckBox Friend WithEvents Label5 As System.Windows.Forms.Label Friend WithEvents ComboBox5 As System.Windows.Forms.ComboBox Friend WithEvents CheckBox3 As System.Windows.Forms.CheckBox Friend WithEvents Label6 As System.Windows.Forms.Label Friend WithEvents ComboBox6 As System.Windows.Forms.ComboBox End Class Imports System.Data Imports System.Data.OleDb Public Class featureadd #Region " Windows Form Designer generated code " Public Sub New() MyBase.New() 'This call is required by the Windows Form Designer. 91
InitializeComponent() 'Add any initialization after the InitializeComponent() call End Sub #End Region Dim con As OleDbConnection = New OleDbConnection("Provider=Microsoft.Jet.OLEDB.4.0;Data Source=" & Application.StartupPath & "\mshop.mdb") Dim com, com1 As OleDbCommand Dim dread As OleDbDataReader
Dim a, b, c As String Private Sub featureadd_FormClosed(ByVal sender As Object, ByVal e As System.Windows.Forms.FormClosedEventArgs) Handles Me.FormClosed Me.Hide() Main.Show() End Sub Private Sub featureadd_Load(ByVal sender As System.Object, ByVal e As System.EventArgs) Handles MyBase.Load Me.StartPosition = FormStartPosition.CenterScreen
92
Me.FormBorderStyle = Windows.Forms.FormBorderStyle.FixedToolWindow Me.Text = "Add Mobile Feature" Label1.Text = "Add Mobile Feature"
Button1.Text = "Exit" Button2.Text = "Save Feature"
Label2.Text = "Select Company" Label7.Text = "Select Model Name"
Label3.Text = "Network Type" With ComboBox3.Items .Add("CDMA") .Add("GSM") .Add("DUEL GSM SIM") .Add("CDMA + GSM") End With Label4.Text = "Camera"
93
With ComboBox4.Items .Add("No") .Add("Less then 2 MP") .Add("2 MP") .Add("3.2 MP") .Add("Greater then 3.2 MP") End With Label5.Text = "Memory Card " With ComboBox5.Items .Add("Not ") .Add("1 GB") .Add("2 GB") .Add("4 GB") .Add("8 GB") .Add("Grater then 8 GB") End With
Label6.Text = "IMEI"
Try con.Open() com = New OleDbCommand("select * from dealer", con) dread = com.ExecuteReader() 94
While dread.Read ComboBox1.Items.Add(dread("mobcom").ToString()) End While Catch ex As Exception Windows.Forms.MessageBox.Show(ex.Message) Finally dread.Close() con.Close() End Try
End Sub Private Sub Button1_Click(ByVal sender As System.Object, ByVal e As System.EventArgs) Handles Button1.Click Me.Hide() Main.Show() End Sub Private Sub ComboBox1_SelectedIndexChanged(ByVal sender As Object, ByVal e As System.EventArgs) Handles ComboBox1.SelectedIndexChanged ComboBox2.Items.Clear() ComboBox6.Items.Clear() 95
Try con.Open() com = New OleDbCommand("select mobmod from dealer where mobcom='" & ComboBox1.Text & "'", con) dread = com.ExecuteReader() While dread.Read ComboBox2.Items.Add(dread("mobmod"))
End While Catch ex As Exception MessageBox.Show(ex.Message) Finally dread.Close() con.Close() End Try
End Sub
Private Sub Button2_Click(ByVal sender As System.Object, ByVal e As System.EventArgs) Handles Button2.Click
Try 96
con.Open() If CheckBox1.Checked = True Then a = CheckBox1.Text Else a = "" End If
If CheckBox2.Checked = True Then b = CheckBox2.Text Else b = "" End If
If CheckBox3.Checked = True Then c = CheckBox3.Text Else c = "" End If com = New OleDbCommand("update dealer SET ntwork ='" & ComboBox3.Text & "', bluetooth ='" & a & "', cam ='" & ComboBox4.Text & "', radio ='" & b & "', memor ='" & ComboBox5.Text & "', wifi ='" & c & "' where mobimei ='" & ComboBox6.Text & "'", con) dread = com.ExecuteReader() 97
MessageBox.Show("New Feature Added", "Features", MessageBoxButtons.OK)
Catch ex As OleDb.OleDbException System.Windows.Forms.MessageBox.Show(ex.Message) Finally dread.Close() con.Close() End Try
CheckBox1.Checked = False CheckBox2.Checked = False CheckBox3.Checked = False End Sub Private Sub ComboBox2_SelectedIndexChanged(ByVal sender As Object, ByVal e As System.EventArgs) Handles ComboBox2.SelectedIndexChanged ComboBox6.Items.Clear() Try 98
con.Open() com1 = New OleDbCommand("select mobimei from dealer where mobmod='" & ComboBox2.Text & "'", con) dread = com1.ExecuteReader() While dread.Read ComboBox6.Items.Add(dread("mobimei")) End While Catch ex As Exception MessageBox.Show(ex.Message) Finally dread.Close() con.Close() End Try End Sub End Class
99
View Mobile Feature page
100
Coding :
101
<System.Diagnostics.DebuggerStepThrough()> _ Private Sub InitializeComponent() Me.Label1 = New System.Windows.Forms.Label Me.Button3 = New System.Windows.Forms.Button Me.Button1 = New System.Windows.Forms.Button Me.DataGridView1 = New System.Windows.Forms.DataGridView CType(Me.DataGridView1, System.ComponentModel.IInitialize).BeginInit() Me.SuspendLayout() ' 'Label1 ' Me.Label1.AutoSize = True Me.Label1.Location = New System.Drawing.Point(322, 26) Me.Label1.Name = "Label1" Me.Label1.Size = New System.Drawing.Size(39, 13) Me.Label1.TabIndex = 13 Me.Label1.Text = "Label1" ' 'Button3 ' Me.Button3.ForeColor = System.Drawing.Color.Maroon Me.Button3.Location = New System.Drawing.Point(481, 433) Me.Button3.Name = "Button3" Me.Button3.Size = New System.Drawing.Size(144, 48) Me.Button3.TabIndex = 11 Me.Button3.Text = "&Close Window" 102
Me.Button3.UseVisualStyleBackColor = True ' 'Button1 ' Me.Button1.Location = New System.Drawing.Point(39, 433) Me.Button1.Name = "Button1" Me.Button1.Size = New System.Drawing.Size(144, 48) Me.Button1.TabIndex = 10 Me.Button1.Text = "View All" Me.Button1.UseVisualStyleBackColor = True ' 'DataGridView1 ' Me.DataGridView1.AllowToAddRows = False Me.DataGridView1.AllowToDeleteRows = False Me.DataGridView1.BackgroundColor = System.Drawing.Color.FromArgb(CType(CType(255, Byte), Integer), CType(CType(224, Byte), Integer), CType(CType(192, Byte), Integer)) Me.DataGridView1.BorderStyle = System.Windows.Forms.BorderStyle.Fixed3D Me.DataGridView1.ColumnHeadersHeightSizeMode = System.Windows.Forms.DataGridViewColumnHeadersHeightSizeMode.Au toSize Me.DataGridView1.Location = New System.Drawing.Point(39, 105) Me.DataGridView1.Name = "DataGridView1" Me.DataGridView1.ReadOnly = True Me.DataGridView1.Size = New System.Drawing.Size(657, 299) 103
Me.DataGridView1.TabIndex = 12 ' 'featuredetail ' Me.AutoScaleDimensions = New System.Drawing.SizeF(6.0!, 13.0!) Me.AutoScaleMode = System.Windows.Forms.AutoScaleMode.Font Me.ClientSize = New System.Drawing.Size(735, 493) Me.Controls.Add(Me.Label1) Me.Controls.Add(Me.Button3) Me.Controls.Add(Me.Button1) Me.Controls.Add(Me.DataGridView1) Me.Name = "featuredetail" Me.Text = "featuredetail" CType(Me.DataGridView1, System.ComponentModel.IInitialize).EndInit() Me.ResumeLayout(False) Me.PerformLayout() End Sub Friend WithEvents Label1 As System.Windows.Forms.Label Friend WithEvents Button3 As System.Windows.Forms.Button Friend WithEvents Button1 As System.Windows.Forms.Button Friend WithEvents DataGridView1 As System.Windows.Forms.DataGridView End Class Imports System.Data 104
Imports System.Data.OleDb Public Class featuredetail #Region " Windows Form Designer generated code " Public Sub New() MyBase.New() 'This call is required by the Windows Form Designer. InitializeComponent() 'Add any initialization after the InitializeComponent() call End Sub #End Region Dim con As OleDbConnection = New OleDbConnection("Provider=Microsoft.Jet.OLEDB.4.0;Data Source=" & Application.StartupPath & "\mshop.mdb") Dim com As OleDbCommand Dim adp As OleDbDataAdapter Dim dtab As DataTable Dim dread As OleDbDataReader Dim i As Integer Private Sub featuredetail_FormClosed(ByVal sender As Object, ByVal e As System.Windows.Forms.FormClosedEventArgs) Handles Me.FormClosed 105
Me.Hide() Main.Show() End Sub Private Sub featuredetail_Load(ByVal sender As System.Object, ByVal e As System.EventArgs) Handles MyBase.Load Me.StartPosition = FormStartPosition.CenterScreen Me.FormBorderStyle = Windows.Forms.FormBorderStyle.FixedToolWindow Me.Text = "View Feature Detail" Label1.Text = "View Mobile Feature detail"
End Sub Private Sub Button1_Click(ByVal sender As System.Object, ByVal e As System.EventArgs) Handles Button1.Click Try con.Open() com = New OleDbCommand("select mobcom, mobmod, mobimei, mobcost, ntwork, bluetooth, cam, radio, memor, wifi from dealer ", con) adp = New OleDbDataAdapter dtab = New DataTable adp.SelectCommand = com 106
adp.Fill(dtab) DataGridView1.DataSource = dtab DataGridView1.Columns(0).HeaderText = "Mobile Company" DataGridView1.Columns(1).HeaderText = "Mobile Model" DataGridView1.Columns(2).HeaderText = "IMEI" DataGridView1.Columns(3).HeaderText = "Cost" DataGridView1.Columns(4).HeaderText = "Network Type" DataGridView1.Columns(5).HeaderText = "Bluetooth" DataGridView1.Columns(6).HeaderText = "Camera" DataGridView1.Columns(7).HeaderText = "Radio" DataGridView1.Columns(8).HeaderText = "Memory " DataGridView1.Columns(9).HeaderText = "Wifi" Catch ex As Exception Windows.Forms.MessageBox.Show(ex.Message) Finally con.Close() End Try End Sub Private Sub Button3_Click(ByVal sender As System.Object, ByVal e As System.EventArgs) Handles Button3.Click Me.Hide() Main.Show() End Sub End Class 107
Selling Form
108
Coding: Imports System.Data Imports System.Data.OleDb Public Class selling Dim con As OleDbConnection = New OleDbConnection("Provider=Microsoft.Jet.OLEDB.4.0;Data Source=" & Application.StartupPath & "\mshop.mdb") Dim com, com1, comcus As OleDbCommand Dim dread As OleDbDataReader Private Sub selling_FormClosed(ByVal sender As Object, ByVal e As System.Windows.Forms.FormClosedEventArgs) Handles Me.FormClosed Me.Hide() Main.Show() End Sub Private Sub selling_Load(ByVal sender As System.Object, ByVal e As System.EventArgs) Handles MyBase.Load Me.StartPosition = FormStartPosition.CenterScreen Me.FormBorderStyle = Windows.Forms.FormBorderStyle.FixedToolWindow Me.Text = "Mobile Selling Form"
109
Try con.Open() com = New OleDbCommand("select * from dealer", con) dread = com.ExecuteReader() While dread.Read ComboBox1.Items.Add(dread("mobcom").ToString()) End While Catch ex As Exception Windows.Forms.MessageBox.Show(ex.Message) Finally dread.Close() con.Close() End Try TextBox1.ReadOnly = True TextBox2.ReadOnly = True TextBox3.ReadOnly = True Label8.Text = "Customer Name" Label9.Text = "Customer Address" Label10.Text = "Date of Purchase" Label11.Text = "Dealer Cost" Label12.Text = "Best Buy" Label13.Text = "Total Cost" Label14.Text = " No."
110
Button2.Text = "Sell Mobile" Button1.Text = "Exit" End Sub Private Sub ComboBox1_SelectedIndexChanged(ByVal sender As Object, ByVal e As System.EventArgs) Handles ComboBox1.SelectedIndexChanged ComboBox2.Items.Clear() ComboBox6.Items.Clear() Try con.Open() com = New OleDbCommand("select mobmod from dealer where mobcom='" & ComboBox1.Text & "'", con) dread = com.ExecuteReader() While dread.Read ComboBox2.Items.Add(dread("mobmod")) End While Catch ex As Exception MessageBox.Show(ex.Message) Finally dread.Close() con.Close() End Try
End Sub
111
Private Sub ComboBox2_SelectedIndexChanged(ByVal sender As Object, ByVal e As System.EventArgs) Handles ComboBox2.SelectedIndexChanged ComboBox6.Items.Clear() Try con.Open() com1 = New OleDbCommand("select mobimei from dealer where mobmod='" & ComboBox2.Text & "'", con) dread = com1.ExecuteReader() While dread.Read ComboBox6.Items.Add(dread("mobimei")) End While Catch ex As Exception MessageBox.Show(ex.Message) Finally dread.Close() con.Close() End Try End Sub Private Sub ComboBox6_SelectedIndexChanged(ByVal sender As Object, ByVal e As System.EventArgs) Handles ComboBox6.SelectedIndexChanged Try con.Open() 112
com1 = New OleDbCommand("select * from dealer ", con) dread = com1.ExecuteReader() While dread.Read TextBox1.Text = dread("ntwork").ToString TextBox2.Text = dread("cam").ToString TextBox3.Text = dread("memor").ToString Label15.Text = dread("mobcost").ToString If dread("bluetooth") <> "" Then CheckBox1.Checked = True Else CheckBox1.Checked = False End If If dread("radio") <> "" Then CheckBox2.Checked = True Else CheckBox2.Checked = False End If If dread("wifi") <> "" Then CheckBox3.Checked = True Else CheckBox3.Checked = False End If End While 113
Catch ex As Exception MessageBox.Show(ex.Message) Finally dread.Close() con.Close() End Try End Sub Private Sub Button2_Click(ByVal sender As System.Object, ByVal e As System.EventArgs) Handles Button2.Click If (TextBox4.Text = "") Then MessageBox.Show("Enter the Customer Name Id") Else Try con.Open() com = New OleDbCommand("Insert into cust(custnam, custadd, custcon, sellimei, sellcom, sellmod, dealercost, sellbstby, selldat, totalcost) values('" & TextBox4.Text & "','" & TextBox5.Text & "','" & TextBox6.Text & "','" & ComboBox6.Text & "','" & ComboBox1.Text & "','" & ComboBox2.Text & "','" & Label15.Text & "','" & TextBox7.Text & "','" & DateTimePicker1.Text & "','" & Label16.Text & "')", con) dread = com.ExecuteReader() MessageBox.Show("Mobile Purchased") 114
Catch ex As System.Exception System.Windows.Forms.MessageBox.Show(ex.Message) Finally dread.Close() con.Close() End Try TextBox1.Text = "" TextBox2.Text = "" TextBox3.Text = "" TextBox4.Text = "" TextBox5.Text = "" DateTimePicker1.Value = Now End If End Sub Private Sub TextBox7_TextChanged(ByVal sender As System.Object, ByVal e As System.EventArgs) Handles TextBox7.TextChanged Dim tot As Integer tot = (CInt(TextBox7.Text) * 14) / 100 Label16.Text = tot + CInt(TextBox7.Text) End Sub Private Sub Button1_Click(ByVal sender As System.Object, ByVal e As System.EventArgs) Handles Button1.Click Me.Close() 115
Main.Show() End Sub End Class
TESTING Testing is a process of executing a program with the intent of finding an error. A good test case is one that has high profitability of an as-yetundiscovered error. A successful test is one that uncovers an as-yet-undiscovered error. Testing presents an interesting anomaly for the software engineers. If testing is conducted successfully it will uncover errors in the software. As a secondary benefit testing demonstrates that software Functions appear to be working according to specification. Data collected at the time of testing is a good indication of software reliability and some indication of software quality as whole.
As far as proposed software is concerned different types of testing have been performed such as Unit Testing 116
Integration Testing Validation Testing Loop Testing
Unit testing: - It is normally performed on individual module. As each module of the proposed system has been developed, the modules are being tested. Integration Testing: - It is performed after unit testing. Integration testing is a systematic technique for constructing the program structure while conducting tests to uncover errors associated with interfacing.
117
IMPLEMENTATION Implementation means to take into practice. A crucial phase in the system life cycle is the successful implementation of the new system design. Implementation includes all those activities that take place to convert from the old system to the new one. The new system may be completely new, replacing an existing manual or automated system. The proposed system is completely new system i.e. the existing system is manual. The Main Aspects of Implementation are as follows: Training Personnel Conversion Procedure Demonstration Training Personnel: Even well designed system can succeed or fail because of the way they are operated and used. Therefore the quality of training received by the person involved with the system in various capacities helps in successful implementation of Proposed System.
118
Conversion Procedure: Conversion is the process of changing from the old system to the new one. It must be properly planned and executed. Four methods are common in use, they are Parallel System Direct Conversion Pilot System Systems Phase-in For the proposed system Parallel System will be beneficial. Under this approach, s continue to operate the old system in usual manner but they will also start using the new system this method is safest one because it ensures that in case of any problems in using the new system, the organization can still fall back to the old system without loss of time and money.
Demonstration: After the system is implemented and conversion is complete, 119
demonstration of the system is given to persons directly or indirectly related with the system.
MAINTENANCE It has been estimated that maintenance of any software product usually requires much more effort than the effort necessary to develop the product. Many studies indicate that the relative effort of development of a typical system to its maintenance effort is roughly in the 40:60 ratios. Maintenance involves performing any one or more of the following three kinds of activities:
Correcting errors that were not discovered during the product development phase. This is called Corrective maintenance.
Improving the implementation of the system and enhancing the Functionality
of
the
system
according
to
the
customer’s
requirements. This is called Perfective maintenance.
Porting the software to a new environment, e.g. to a new computer or to a new operating system. This is called Adaptive maintenance.
In the proposed Loan Processing system we had done Corrective
120
maintenance and adaptive maintenance.
REFERENCES Websites:1) www.google.com 2) www.icici.com 3) www.sbhyb.com 4) www.Scribd.com
121
Related Documents 3m3m1z
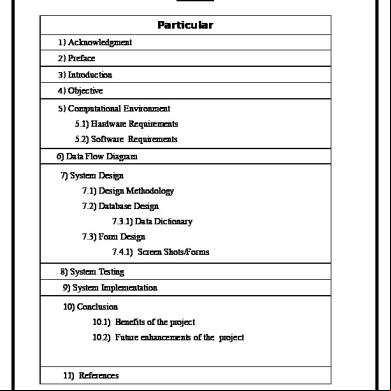
Mobile Shop Management System 704u6y
November 2019 85
Mobile Shop Management System Documentation 5z3x5s
November 2019 101
Mobile Shop Management System Documentation 5z3x5s
December 2019 146
Medical Shop Management System 4d6p2i
December 2019 53
Book Shop Management System g6z1x
January 2022 0
Pet Shop Management System 2dt3j
October 2022 0More Documents from "rajour" 2q673i