Hybrid Racing 92-95 Civic Ac Install Guide V1.1 162w4y
This document was ed by and they confirmed that they have the permission to share it. If you are author or own the copyright of this book, please report to us by using this report form. Report 3b7i
Overview 3e4r5l
& View Hybrid Racing 92-95 Civic Ac Install Guide V1.1 as PDF for free.
More details w3441
- Words: 1,840
- Pages: 14
ACEG01 AC Line Kit for 92-95 Honda Civic Instructions Version 1.1: Below you will find instructions on how to install your AC Line kit for the 92-95 Civic Chassis. *AC Kit may not be legal for highway use. Hybrid Racing is not responsible for any direct or indirect, actual or incidental expense attributed to the use of any performance parts sold by Hybrid Racing LLC. Purchasers agree to all of the of this agreement upon the purchase of parts. More information can be found at www.hybrid-racing.com.
1. PACKAGE CONTENTS: 4 AC Line’s, Relay, Install Guide and 5 Mounting Brackets.
PARTS NEEDED: NOTE: if you are installing this kit into a 95 civic please email us at [email protected]. 1. Stock 96-2000 Honda Civic condenser these are available from hybrid racing used from $100.00 depending on availability. 2. An evaporator from a 92-94 Civic 3. 3 of the OEM EG lines as outlined in the Image below (these lines are from a 92-94)
OEM part number: 80343-SR1-A11 LINE 14 $48
OEM part number: 80342-SR1-A11 LINE 13 $25.03
OEM part number: 80341-SR1-A11 LINE 12 $65.82
4. A High Performance slim fan rated at 1000cfm at 0°H20 or better that is 2in thick SPAL part number P# 30100467. 5. Stock bushings for mounting tabs: either 80177-SR1-000 or 74172-SR3-000 based on instruction 6 or 8. 6. Pressure sensor from a 1992 EG Civic P# 80440-SM4-003 $52.00. 7. PAG synthetic based Refrigerant oil. 8. Teflon Tape
•
TOOLS NEEDED: 1. Rivets and Rivet gun 2. Basic hand tools 3. Soldering iron, solder and heat shrink for wiring. Before beginning the installation of these lines we recommend consulting someone with AC experience. You will need to place the car under a vacuum and double check that you have enough Refrigerant Oil in your system. We have included a guide explaining what to do to make sure that you have enough oil in the system as well as various amounts to add for each line. If you have been driving the car with the condenser on but not sealed you will need to add oil or the system will not function properly.
1. Begin by removing the battery and battery tray to gain access to the OEM AC lines that you need to remove. 2. Remove all of the lines highlighted in RED as outlined by the below image.
3. Next remove your radiator to make room for the installation of the condenser and Line D. 4. The lines that are highlighted in Green above stay in the car. There part numbers are #14 80343-SR1-A11, #13 80342-SR1-A11, #12 80341-SR1-A11, if you do not have them you need to get them.
5. Next take your 96-2000 Civic condensers and attach the 2 brackets and your replacement slim fan as shown leave the thin long one Labeled E loose until after installation. Make sure that the fan is rated at 1000CFM or more. We suggest SPAL fan part # 30100467.
6. If you still have your OEM brackets as shown you can drop your condenser directly into the car using the OEM EG radiator bushings part # 74172-SR3-000.
7. If you have already removed these brackets during the installation of your Radiator you will need to install the 2 L brackets into this location. Use the condenser as a guide as well as the OEM drill and weld marks from the removal of your radiator tabs.
8. Install the brackets using a Rivet gun that can be purchased at your local auto parts store for under $15. You will need to drill 2-3 holes into the L bracket to mount them. You can use the OEM bushings from your EG condenser fan with these brackets EG condenser fan part # 80177-SR1-000.
9. Next take the upper mounting bracket and install the thin adhesive backed bushing material into the inside as shown. Remove any additional material from the bracket.
10. Your condenser is not mounted and you will need to secure it with the upper mounting bracket and bolts that are provided. Make sure to install the thin bushing material to ensure that the bracket does not move. If you do not install the bushing you run the risk of damaging your condenser.
NOTE: Before beginning installation of lines. You may have to slightly bend the lines depending on your specific engine bay. For the
most part they will fit but in the event that you do need to bend a line to clear something do so smoothly and softly as you don’t want to kink the line. Make sure that the lines are not resting in a position where they could rub a hole into them ect.. This applies to all lines:
1.
1.
Make sure to use refrigerant oil on the O rings to make sure they do not rip or become damaged
2.
You can bend the lines slightly to move them off of items in the engine bay. (FAN, BRACKETS, etc etc.)
3.
You will use your OEM 10mm bolts.
Begin by installing LINE D as shown in the below image. Make sure you have removed the battery and battery tray, also make sure to use refrigerant oil on the O rings to assure they do not rip or become damaged. Once this line is installed you can move on to the next step.
2.
Next install LINE B with the low side port (blue cap). These 2 lines connect to each other. Make sure that there is an O ring here or the lines will leak. In addition make sure that they are completely together before securing them with the nut. This means don’t use the tightening of the nut to pull the 2 lines together. You want to make sure that this line is not kinked in any way and it should sit close to and somewhat under the headlight housing. In addition make sure that this line does not sit on the fan in anyway. If you need bend the line slightly to move it off the fan.
3.
Next install the high side LINE C (red cap) the high side port will connect to the top of the condenser using the OEM 10mm bolts. Again make sure that the line does not sit on the fan in anyway, if you need to bend the line slightly to move it off the fan do so.
4.
Finally install Line A. The side with the 180 degree bend connects to the bottom of the condenser and the other end connects to the evaporator. There is an OPEN port on this line make sure to install the OEM pressure switch here. When installing this switch use Teflon tape or some form of sealant.
2. Once all of the lines are installed make sure that everything is secure and is not in a position to rub or come in with the drive belt. You are now ready to move to the wiring portion of the install.
3. Begin by locating your OEM fan connector and your OEM compressor connectors. They will be located here. The FAN connector will have 2 wires one BLK and one BLU/BLK. The compressor connector will have one RED wire.
4. You will need to run your OEM fan connector to the newly installed SLIM performance fan make sure that the fan is pulling and not pushing. If the fan is hooked up backwards it will still work but very inefficiently. 5. Next take the single wire that controls the compressor and extend it to your new K Series compressor. The connectors should be the same from your EG chassis to the K Series compressor. 6. Next connect the OEM pressure switch connector to the sensor installed in LINE A. This connector should have enough space so that you do not have to extend it. This sensor is located in your OEM condenser and has a green body. 7. If you have a K pro continue below. If you do not have a K pro skip to #14
8. Connect A15 BLK/RED wire on the stock ECU connector to E18 on the RSX ECU Connector using the supplied Yellow wire and pin.
9. Connect B5 a BLU/RED wire on the stock ECU connector to B9 a BLU/BLK wire on the RSX ECU Connector. 10. Next you will need to activate the Alternate AC input switch under Parameters: Misc. in the K manager software.
11. Finally make sure that your Oil Pressure switch and the Multiplexor are disabled. In the Kmanager software.
12. SKIP Step 14
13. If you have a stock Type R ECU or any other OEM ECU take the relay that was included with your AC lines and connect the wires as follows: 92-95 Civic chassis
Red wire PIN 85
12v in the run position
Blue wire PIN 87
Ground
Yellow wire PIN 30
ACC A15 BLK/RED on the stock ECU
Green wire PIN 86
ACS B5 BLU/RED on the stock ECU
14. Once the AC lines are installed and the wiring is complete you must take the car to a certified AC technician to have the AC system put under a vacuum and charged. Make sure to have the technician pressure check and test the system before you leave.
You have successfully completed your AC Line Install! If you have any questions or comments please email [email protected] Legal Disclaimer s assume all cost and risk associated with these or any other items purchased from the hybrid racing LLC web site. Parts sold or manufactured by Hybrid Racing LLC may not meet legal requirements for use on public roads. People thinking about purchasing product from Hybrid Racing LLC should check with their local or state authorities for legality. It is the ’s responsibility to know and comply with all local and federal laws and regulations. Use or installation of Hybrid Racing LLC products may affect insurance and/or vehicle warranty coverage. It is the ’s sole responsibility for consequences that may occur due to having the product installed in his/her vehicle. Hybrid Racing LLC assumes no legal responsibilities and/or liabilities, whether to ’s vehicle, engine, person(s), and/or property(s), that result from the use of, or servicing of a vehicle of which a Hybrid Racing LLC product has been installed/attempted to be installed, or to any other vehicle(s) and/or person(s), regardless of whether or not this product has any involvement directly or indirectly and/or liability, and/or whether or not proper installation has been carried forth.All engines, engine parts and electrical components are for OFF ROAD USE ONLY/RACING VEHICLES ONLY. They are not for or to be used on public roads in the USA.Acquisition of a Hybrid Racing LLC product will act as an acknowledgement of the legal disclaimer stated herein. Hybrid Racing LLC reserves the right to change this disclaimer at any time without any prior consent or notification. Should you need to us our details are as follows: Hybrid Racing LLC, 3348 Drusilla Lane, Suite 2C, Baton Rouge, LA 70809 www.hybrid-racing.com
Related Documents 3m3m1z

Hybrid Racing 92-95 Civic Ac Install Guide V1.1 162w4y
November 2019 35
Hybrid Racing 8th Gen Cai Install Guide 566m18
December 2019 74
Hybrid Racing K-series Fuel Rail Install Guide 336x42
December 2019 52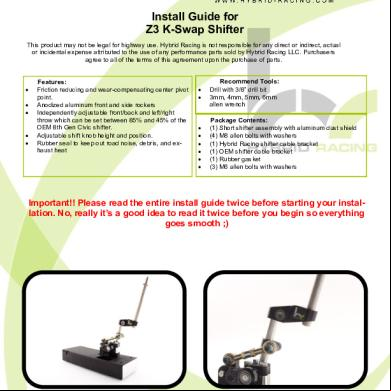
Hybrid Racing Z3 K-swap Shifter Install Guide 503s1b
November 2022 0
Xcarlink Honda Civic Install 4i4v4w
May 2023 0
Civic Engine Swap Guide 1l2j1d
November 2019 45More Documents from "Hybrid Racing" 4k283s
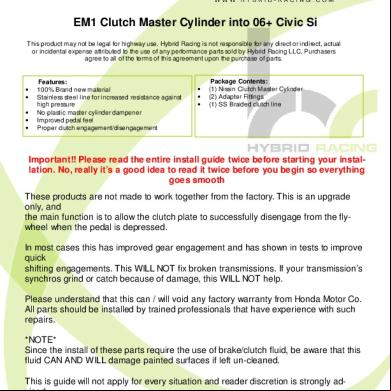
06+ Civic Si Cmc Swap Guide 1p204f
November 2019 39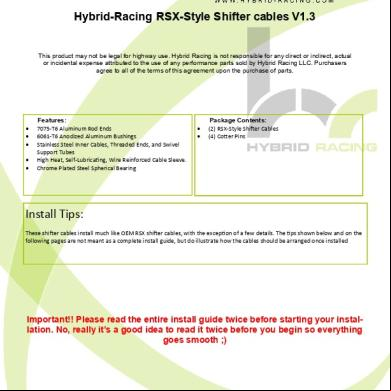
Rsx Shifter Cable Install Guide V1.3 2z1i59
December 2019 32
8th Gen Shifter Cables Install Guide 1l481g
December 2021 0
Hybrid Racing 92-95 Civic Ac Install Guide V1.1 162w4y
November 2019 35
Rsx Shift Cable V1.2 Install Guide 71ov
December 2021 0