Teradata Sql Assistant Web Edition Tutorial 5cm44
This document was ed by and they confirmed that they have the permission to share it. If you are author or own the copyright of this book, please report to us by using this report form. Report 3b7i
Overview 3e4r5l
& View Teradata Sql Assistant Web Edition Tutorial as PDF for free.
More details w3441
- Words: 1,414
- Pages: 7
Teradata SQL Assistant / Web Edition Tutorial This tutorial briefly explains how to access Teradata SQL Assistant / Web Edition and execute queries on available data sets. We will also explore how to manage queries, and utilize perm space to create your own database objects to load with existing or your own data. This tutorial assumes that you already have a ed for use with Teradata SQL Assistant / Web Edition. If not, please refer to the Teradata Database Website Overview on the Teradata Database landing page for registration instructions.
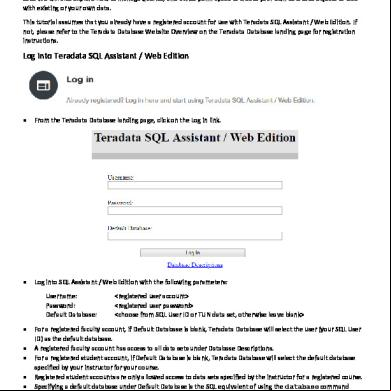
to Teradata SQL Assistant / Web Edition
•
From the Teradata Database landing page, click on the link.
•
to SQL Assistant / Web Edition with the following parameters: name: : Default Database:
• • • • • •
For a ed faculty , if Default Database is blank, Teradata Database will select the (your SQL ID) as the default database. A ed faculty has access to all data sets under Database Descriptions. For a ed student , if Default Database is blank, Teradata Database will select the default database specified by your instructor for your course. ed student s are only allowed access to data sets specified by the instructor for a ed course. Specifying a default database under Default Database is the SQL equivalent of using the database command inside the Query Space (e.g. database db_pvfc9_std;) For more information on the Default Database command click here.
Teradata SQL Assistant / Web Edition Overview Note: It is recommended for s to disable pop-up blockers or whitelist Teradata SQL Assistant / Web Edition, as some features may not work as intended.
Teradata SQL Assistant / Web Edition is comprised of different sections: • • • • •
A left-hand navigation pane revealing a list of accessible databases and the objects that make up each database. (The plus (+) and minus (–) icons indicate if database objects can be expanded and collapsed) A main navigation menu which allows you to end your SQL session, execute a query, limit the rows returned, and perform other general functions associated with SQL query processing. A Query section where Teradata SQL commands are entered for execution. A History section where previously run queries and their associated information are saved for analysis. An Answer Set section where query results are returned after execution.
We will now explore some basic functions within Teradata SQL Assistant / Web Edition.
Using the Left-Hand Navigation Pane to Add & Remove Databases To add a database: •
Click on the Add button on the top-left corner. Type in the name of the database you would like to access in the pop-up that appears, and click OK once finished. For example, we are adding the db_pvfc9_std database here:
•
Click on OK to add the database, and it will appear highlighted in the navigation pane as an expandable tree. (An error message will appear if the database does not exist or is invalid) You should now be able to use the navigation pane to explore the database objects within db_pvfc9_std.
•
To remove a database: •
Click and highlight the database you wish to remove, and click on the Remove button on the top-left corner. For example, we are removing the db_pvfc9_std database here:
• •
The highlighted database should appear in the following pop-up window. Click on OK to remove the database. The database will be removed from the left-hand navigation pane.
Executing Queries on Teradata SQL / Web Assistant
•
Queries are typically typed or pasted into the Query section and executed by clicking on the Execute / Run ( in the main navigation menu (highlighted above in red).
•
The Execute / Run ( ) icon will execute all queries inside the Query section, store them in the History section, and returns the results (if any) in the Answer Set section. Queries can also be loaded and run from a .txt file containing one or more query statements using the Open Query ( ) icon in the main navigation menu (highlighted above in blue).
•
•
Clicking on Open Query ( as our query source.
•
Load will simply paste the contents of testquery.txt into the Query section.
•
Run will perform the equivalent of Execute / Run (
) icon
) displays a pop-up window (pictured below). Here we have selected testquery.txt
) on testquery.txt.
Note: When executing queries, take care to note which database you are referencing when writing SQL statements. •
•
•
Leaving Default Database blank at will set your default database to the one set by your instructor for your course. If you are running queries in your own perm space, setting the Default Database to your SQL ID can keep queries in the scope of your perm space unless specified otherwise. One way to ensure proper database reference involves using the database command before every set of queries you would like to run. For example, a database db_pvfc9_std; statement will reduce ambiguity for subsequent SQL statements referencing two different databases that share a common table name. Another method involves including the proper database / name for every referenced database object. While tedious, this method eliminates ambiguity within SQL statements.
Query History
• •
Executed queries are saved in the History section as rows in a table (pictured above). To load previously run queries from the History section into the Query section, simply click on the SQL Statement for a row in the History section.
•
For a row in the History section, clicking on Edit will open a new window that allows a to do the following: o Delete all history rows associated with your name by clicking Delete All. o Delete the current history row by clicking Delete. o Modify the SQL statement(s) and optional Notes sections, then click Update to save changes.
Data Sets & Write Capabilities In addition to writing and executing SQL queries, functionality for Teradata SQL Assistant / Web Edition on TUN has been enhanced to include write capabilities. Therefore, in addition to SELECT statements, your SQL statements can include keywords such as CREATE, GRANT, INSERT, UPDATE, DELETE, and so forth. Using this feature, a professor can create a sample database in his or her and then grant students access to the database. For Teradata SQL Assistant / Web Edition, a faculty has 12GB of writeable space (perm space) to use for creating database objects (tables, views, macros, etc.). Upon ing for a course, a student is assigned 3GB of perm space. Both faculty and student s can create database objects in their respective perm space by referring to their SQL ID in database commands and queries. One way to easily run queries in your assigned perm space is by setting your Default Database to your SQL ID when logging into SQL Assistant / Web Edition. A second way is to reference your SQL ID in SQL queries and statements when referencing database objects in your perm space. A professor can choose to create and submit a new database for use in Teradata Database courses. Navigate to the Teradata Database landing page on TUN and click on Submitting a New Dataset for SQL Assistant for more information.
Batch Loading using TUN Database Scripts Teradata Database on TUN provides text-based database scripts which can be used with Teradata SQL Assistant / Web Edition to load TUN data sets into your perm space. A list of database textbooks and their associated .txt files are available under Database Descriptions (highlighted in red) on the Teradata SQL Assistant / Web Edition page.
• • • •
To start, a text file of your choice from the Database Descriptions list (e.g. copy_db_pvfc9_std.txt) to Teradata SQL Assistant / Web Edition using your SQL ID as the Default Database. Click on Open Query ( ) from the main navigation menu and select copy_db_pvfc9_std.txt. Click on Run to execute the SQL statements within copy_db_pvfc9_std.txt. (Ensure that adequate perm space is available to execute queries that involve copying large data sets)
Conclusion When you have finished using Teradata SQL Assistant / Web Edition, please click on the disconnect ( top of the screen to end your session. You may close your browser window if you wish.
) button on the
Related Documents 3m3m1z
Teradata Sql Assistant Web Edition Tutorial 5cm44
October 2022 0
Teradata Sql 183m2v
March 2021 0
Teradata Tutorial 243t13
December 2019 56
Teradata Sql(tera Tom) 2s613v
October 2019 80
Teradata-advanced-sql-part1.pdf 2h381v
October 2019 65
Teradata Sql Query Optimization Or Performance Tuning 1x4d5t
December 2019 33More Documents from "Sarath Chowdary" q4968
Teradata Sql Assistant Web Edition Tutorial 5cm44
October 2022 0
Utl File Package 60hu
May 2021 0
Confession - Meaning In Tamil 1dy1b
October 2021 0
Toll Management System Design Presentation 1m6h2h
April 2022 0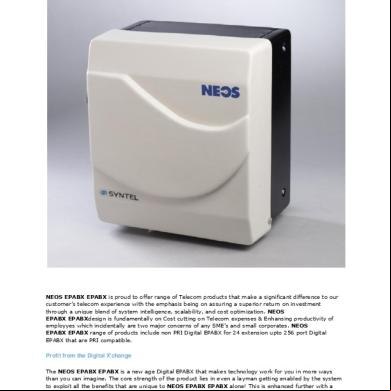
Syntel Neos Epabx 25421i
December 2019 184